
Splandesk User Manual v1.3.0
Your comprehensive guide to using Splandesk effectively.
Import Checklist
- import students - with jee / neet tag
- import teachers - with timings
- import rooms (or set room count in branch settings)
- import syllabus / books (subjects page) download from drive
- for jee and neet need to combine both ICSE and JEE/NEET into one
- create teaching group
- for sections A, A JEE, A Neet
- A = for both NEET and JEE, used when both students attend single lecture
- A JEE - just jee students for tests
- A Neet - just neet students for tests
- Add students to teaching group
- Add teachers to teaching group
- Import past attendance
- share attendance excel with us (eminent)
- we would convert it to different excel sheet
- upload that excel sheet
- Import past test scores
- Import omr template
- Import timetable per section
Login
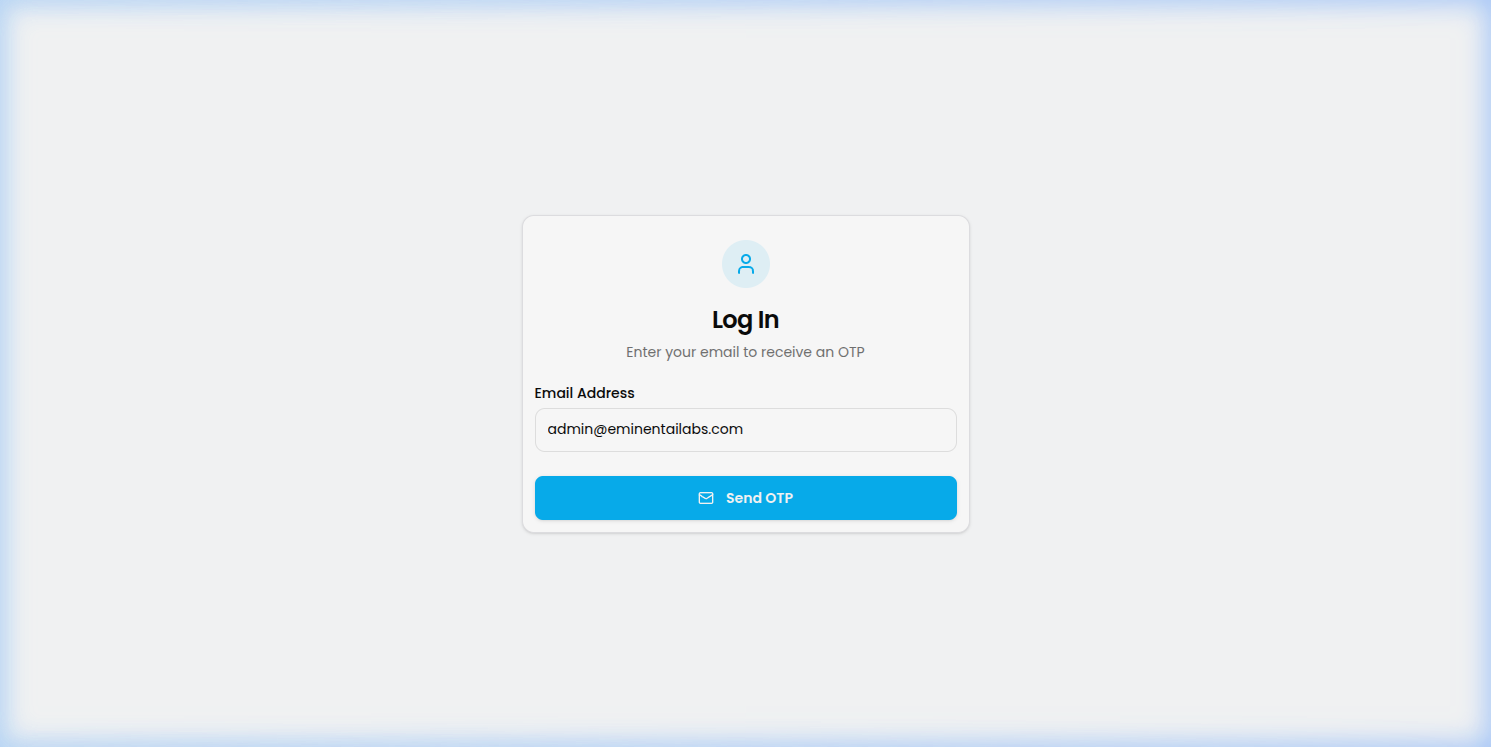
- Login with Email: Enter your registered email address and click "Send OTP" to receive a login code.
Branch Selection
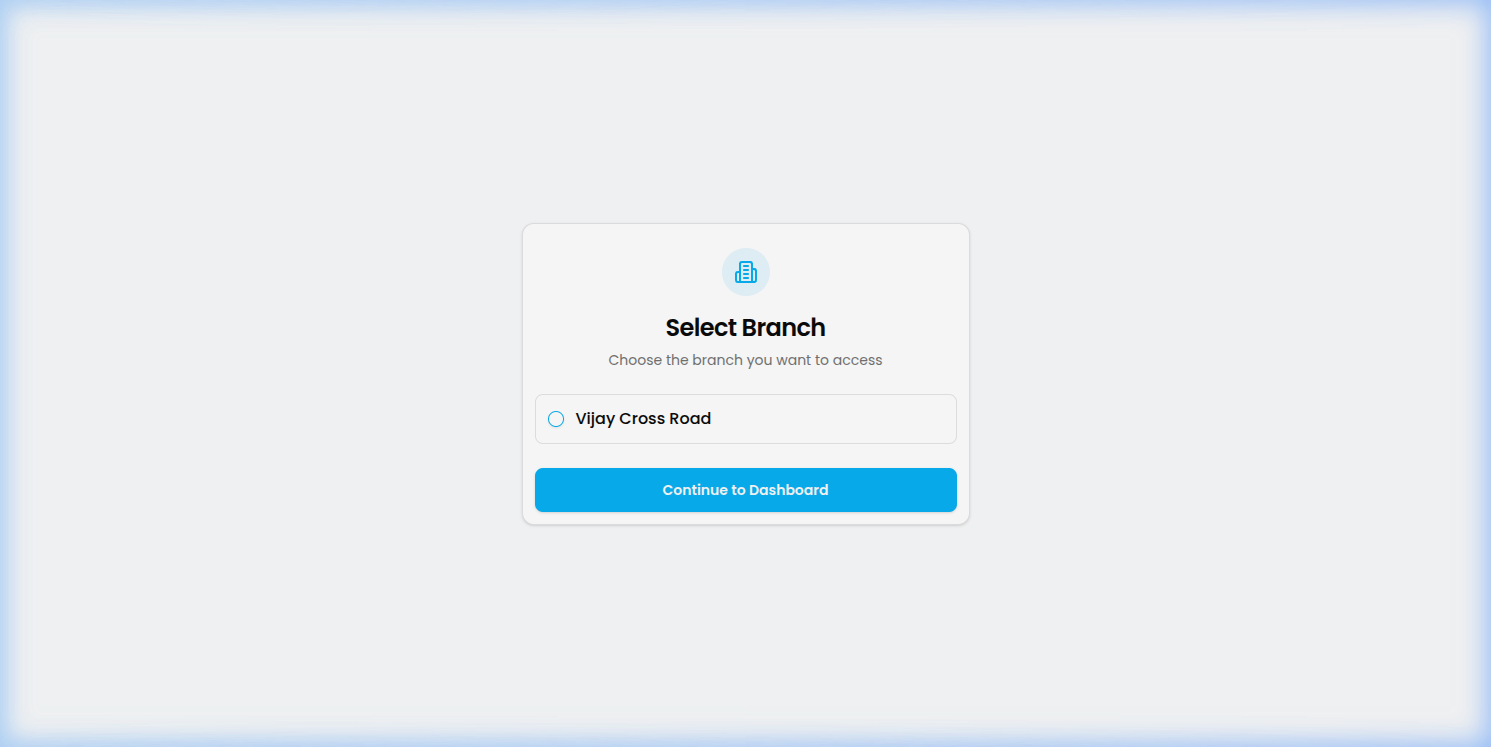
- Select your Branch: A branch is a physical location. Choose the branch you want to access and click "Continue to Dashboard".
Dashboard
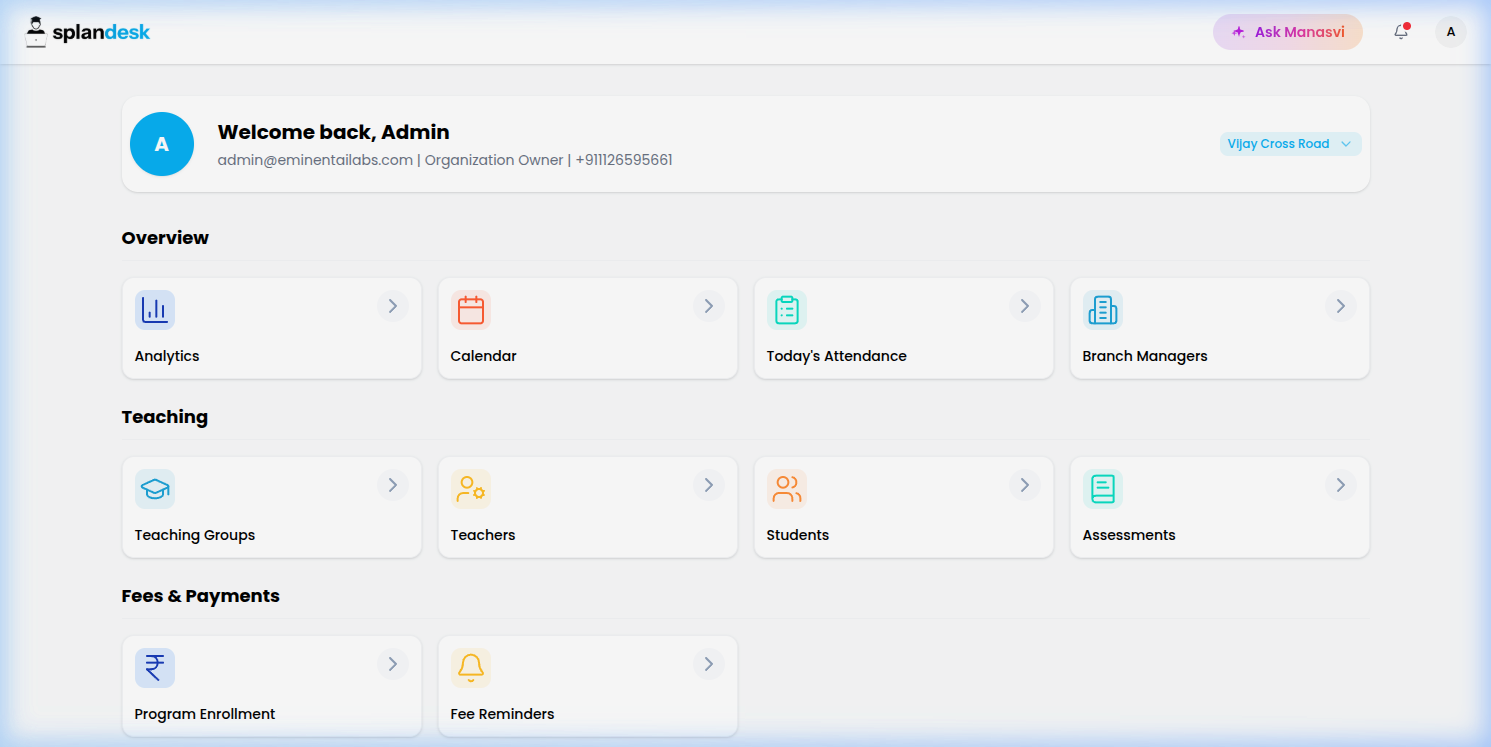
- Dashboard Overview: After logging in, you'll see the main Dashboard. From here, you can access Analytics, the Academic Calendar, Teaching Groups, Live Streaming & Class Recording, and manage Students and Teachers.
Manage Teachers
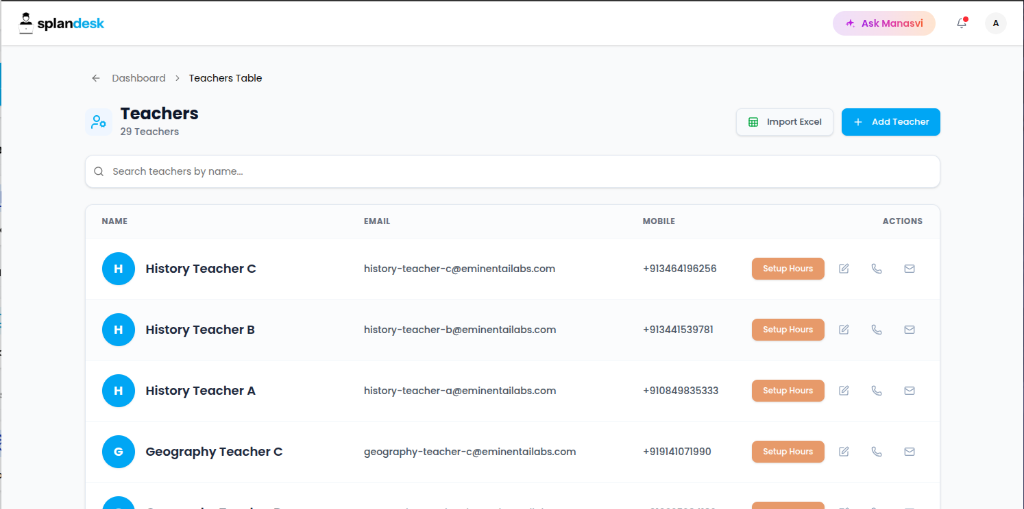
The Teachers section allows you to manage all educators in your branch.
1. Teachers Overview
View a complete list of teachers, their email addresses, and contact numbers.
2. Adding a Teacher Manually
Click the "+ Add Teacher" button to open the creation form. Enter the teacher's name, email, mobile number, and set their default working hours.
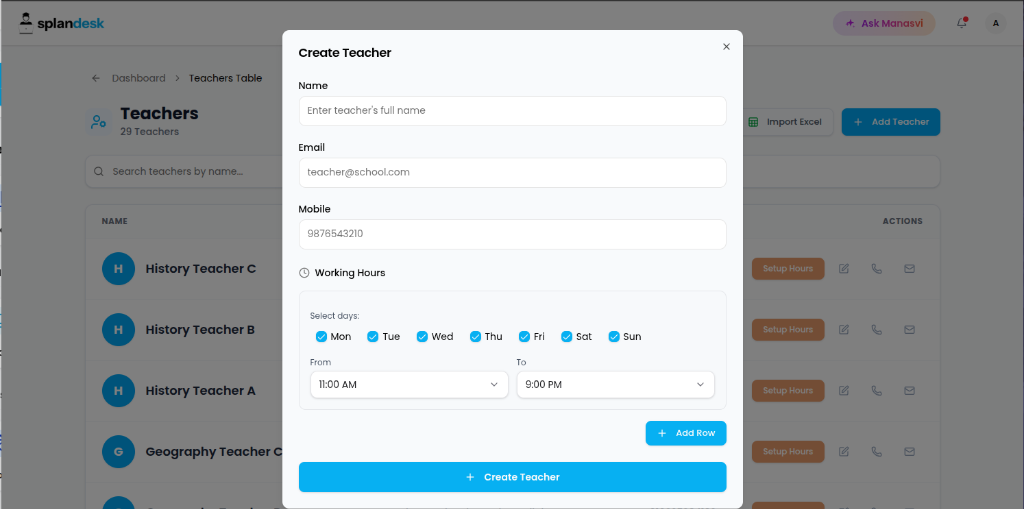
3. Bulk Import from Excel
Click "Import Excel" to add multiple teachers at once.
- Download Template: You must download the provided Excel template.
- Upload: Fill in the details in the Excel file and upload it to complete the import.
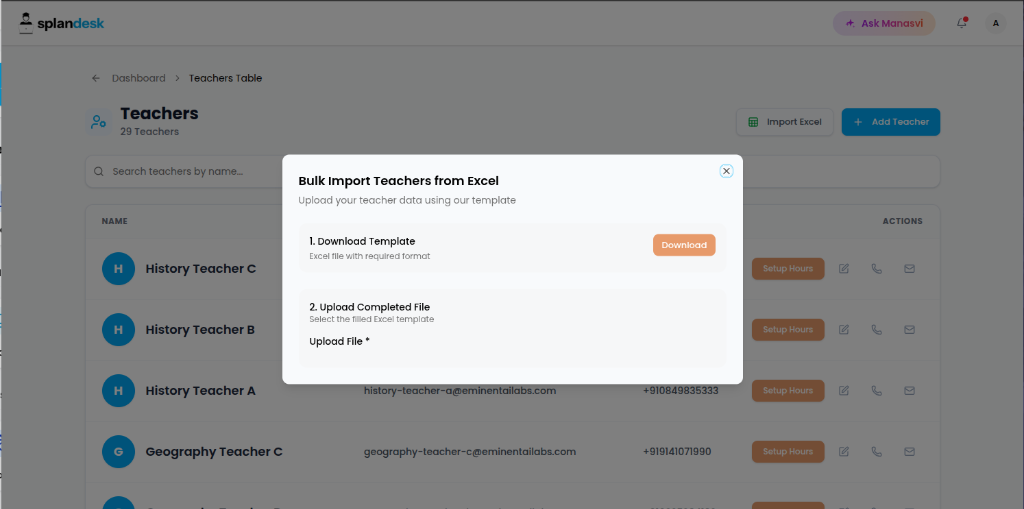
4. AI-Assisted Import (Ask Manasvi)
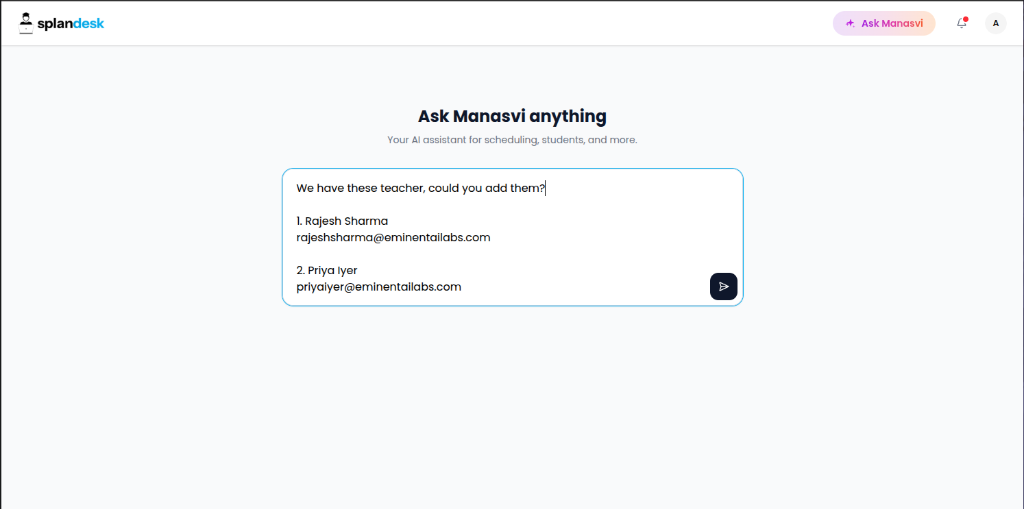
You can also import teachers by simply chatting with Manasvi, your AI assistant.
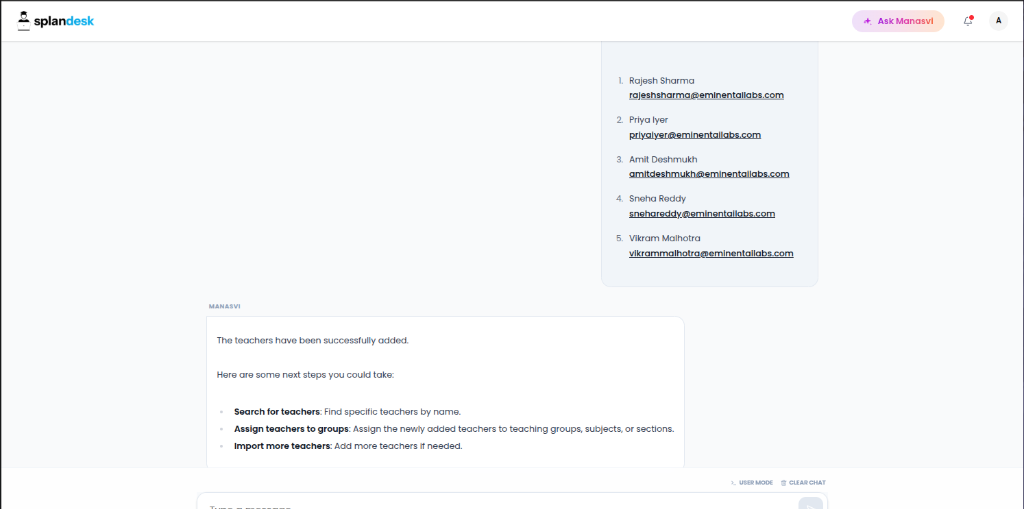
- Method: Paste the list of teacher names and emails directly into the chat and ask Manasvi to add them.
- Confirmation: Manasvi will process the data and confirm once the teachers have been successfully added to your branch.
Manage Students
The Students section allows you to manage enrollment and personal details for all students in your branch.
1. Students Overview
Filter students by Standard or Education Board, and search by name or roll number.
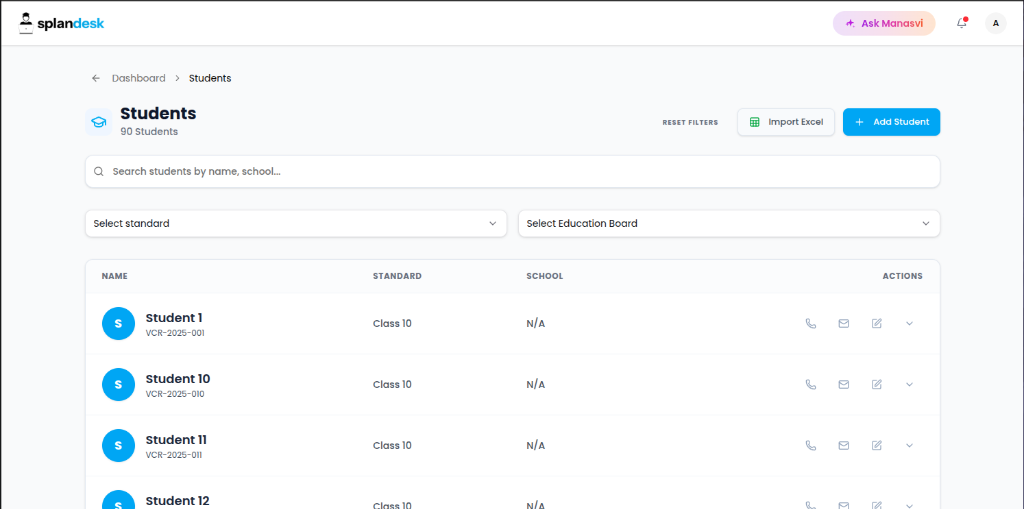
2. Adding a Student Manually
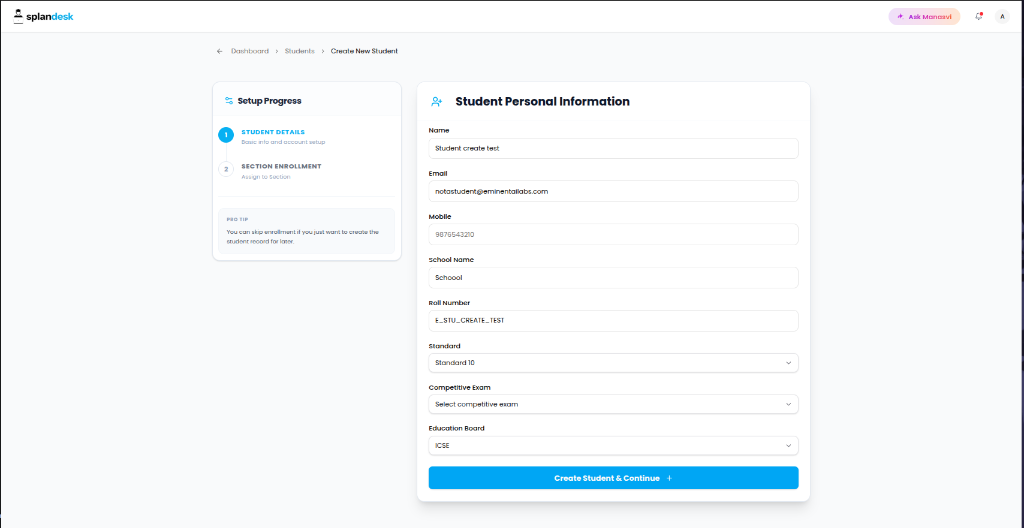
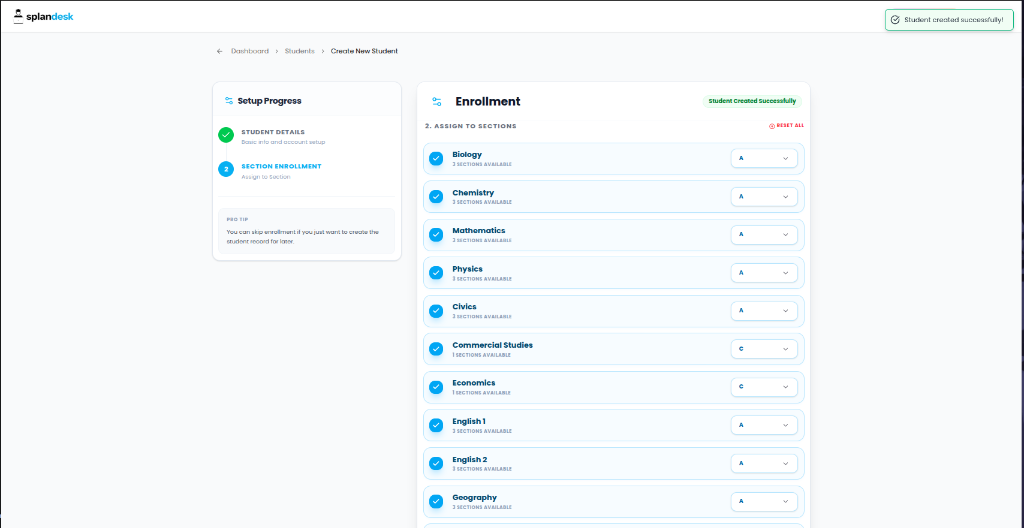
Click "+ Add Student" to start the multi-step enrollment process:
- Step 1: Student Details: Enter the student's name, email, standard, roll number, and education board.
- Step 2: Section Enrollment: Enroll the student into specific sections for their required subjects.
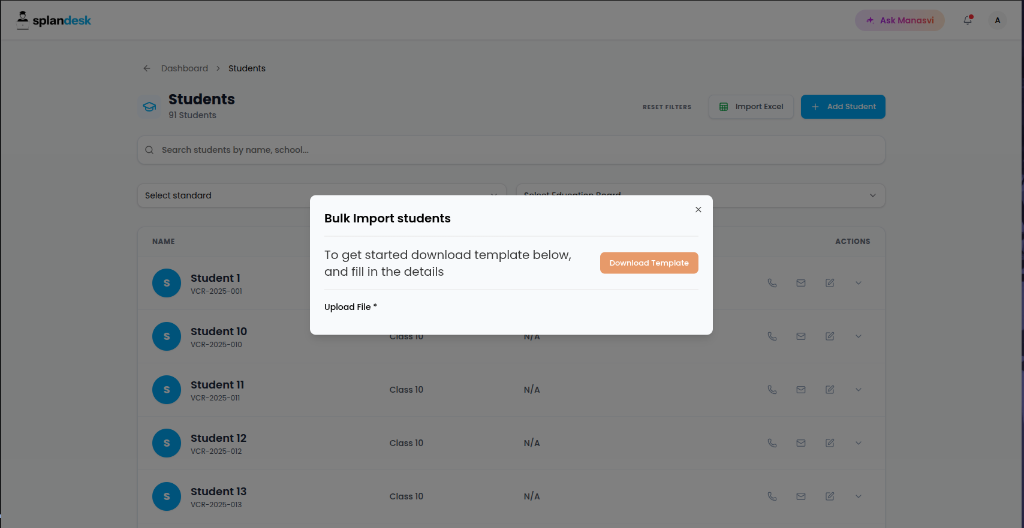
3. Bulk Import from Excel
Click "Import Excel" to download the template, fill in student data, and upload the completed file.
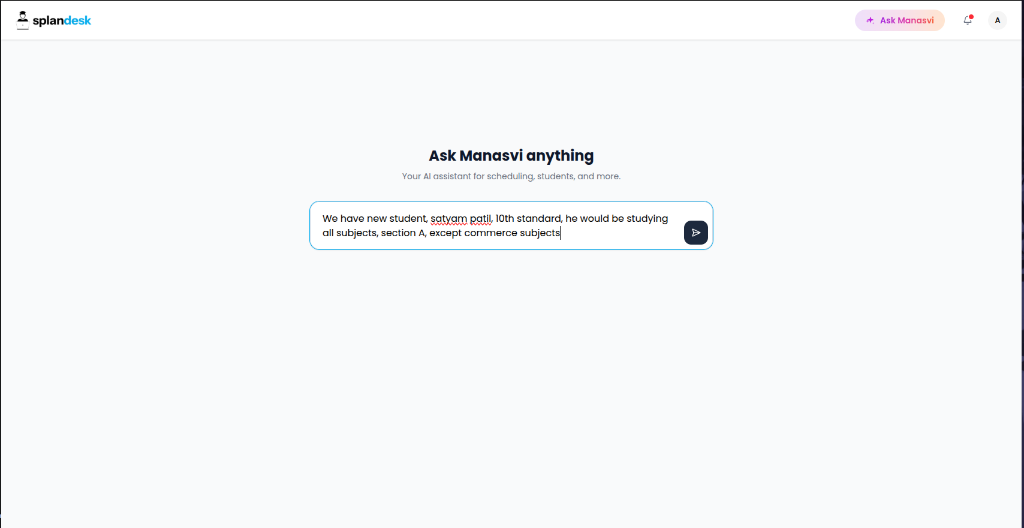
4. AI-Assisted Student Management (Ask Manasvi)
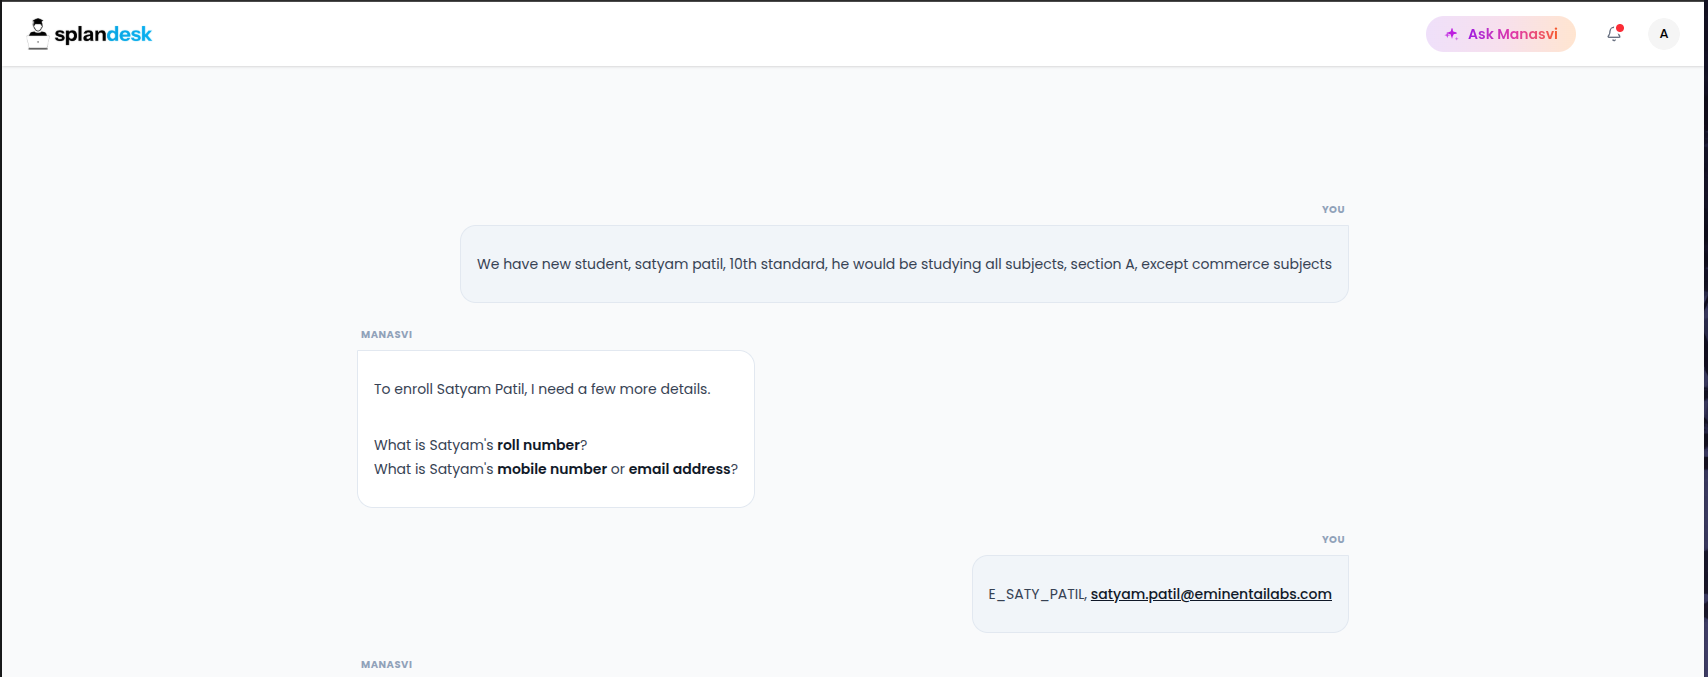
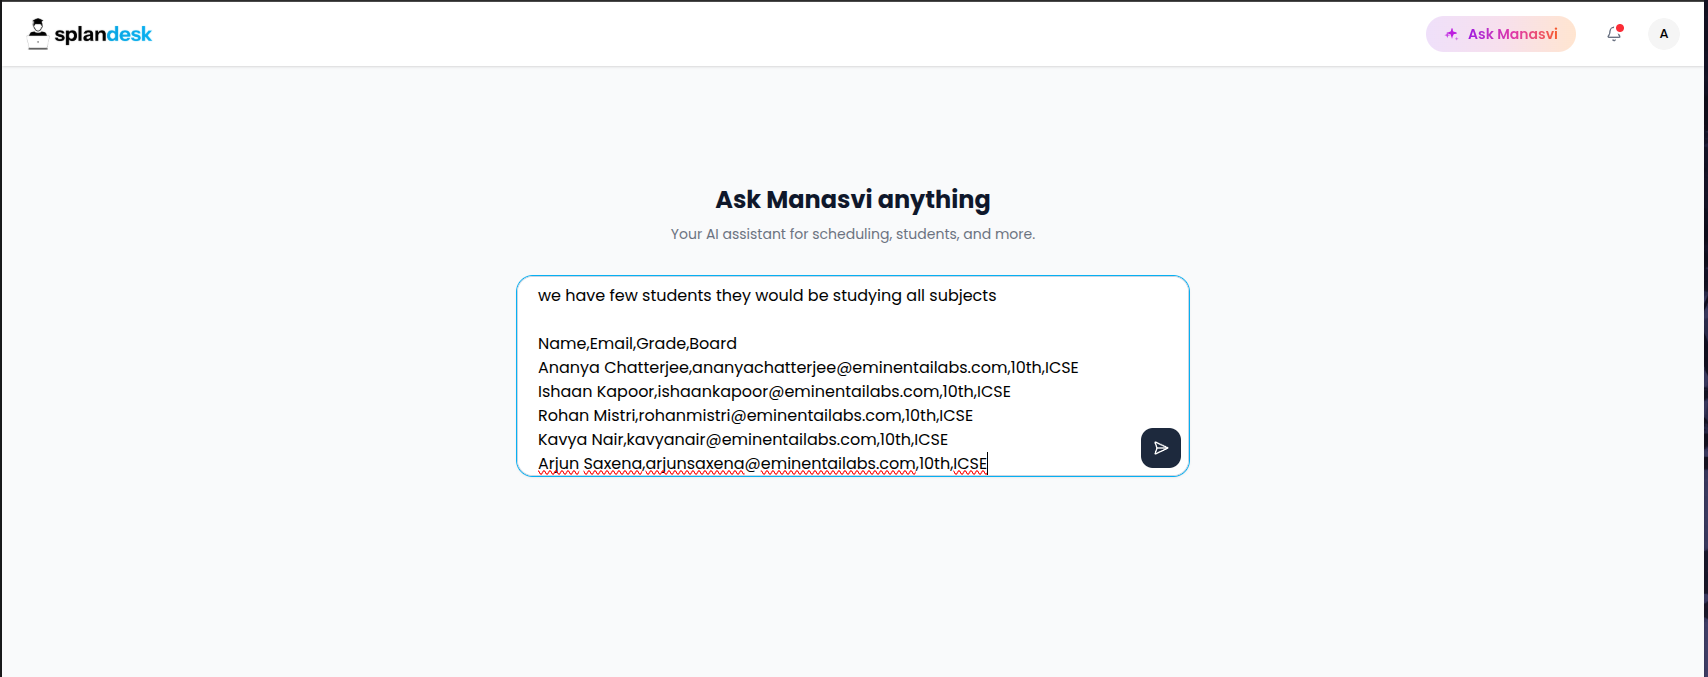
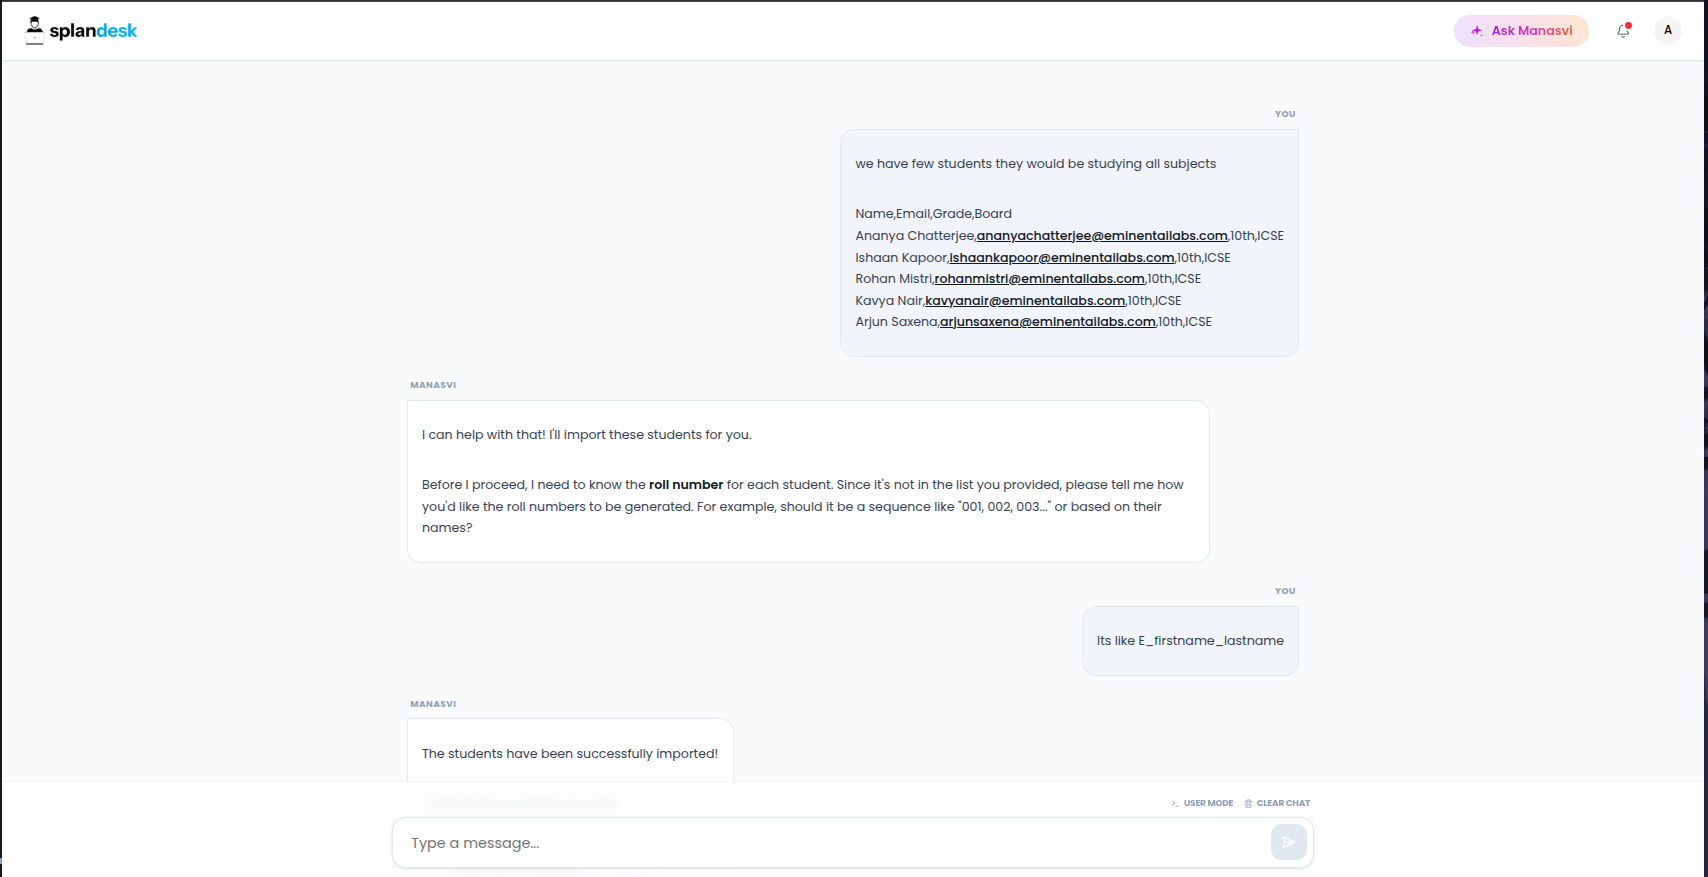
You can create and enroll students using natural language via the Manasvi chatbot.
- Single Entry: Ask Manasvi to add a new student. If any details are missing (like standard or email), Manasvi will prompt you for them.
- Bulk Paste: You can also paste bulk student data into the chat, and Manasvi will handle the creation and enrollment for you.
Teaching Groups
A Teaching Group is a cohort or group of students learning the same subjects for a particular academic term (e.g., "10th ICSE 2025-26").
1. Groups Overview
View all active teaching groups, their education board, standard, and status.
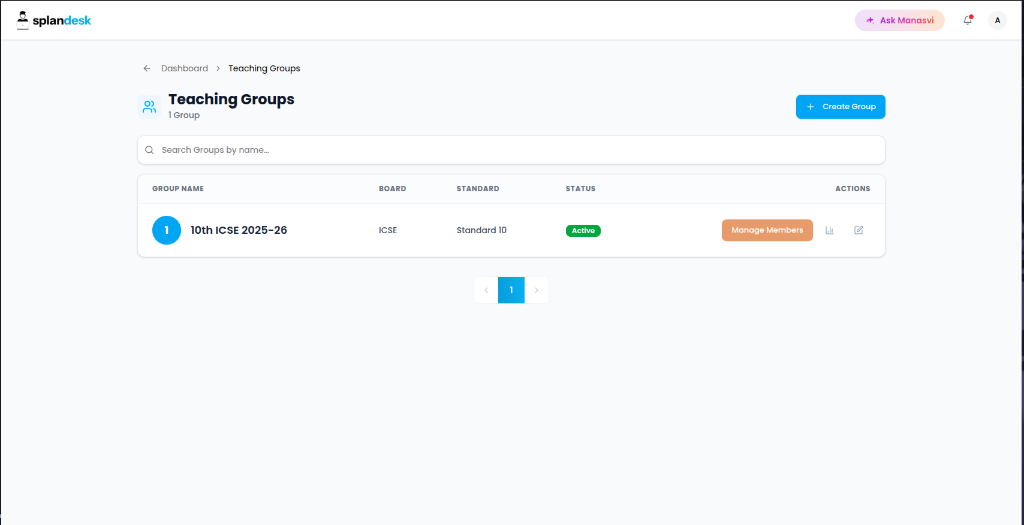
2. Creating a Teaching Group
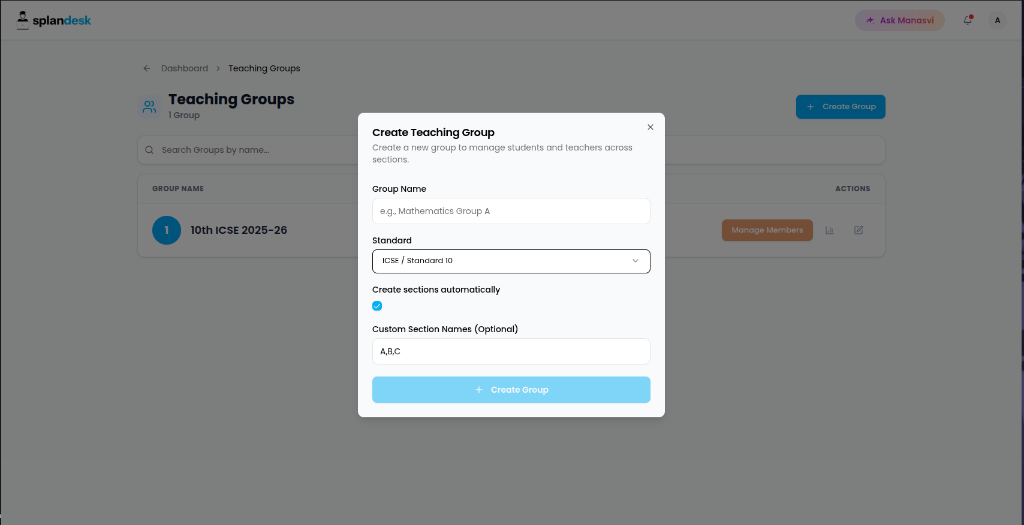
Click the "+ Create Group" button to set up a new cohort:
- Details: Enter the Group Name and select the Standard (which includes the Education Board).
- Sections: You can automatically create multiple sections (e.g., A, B, C) by listing them in the "Custom Section Names" field.
3. AI Group Management & Migration (Ask Manasvi)
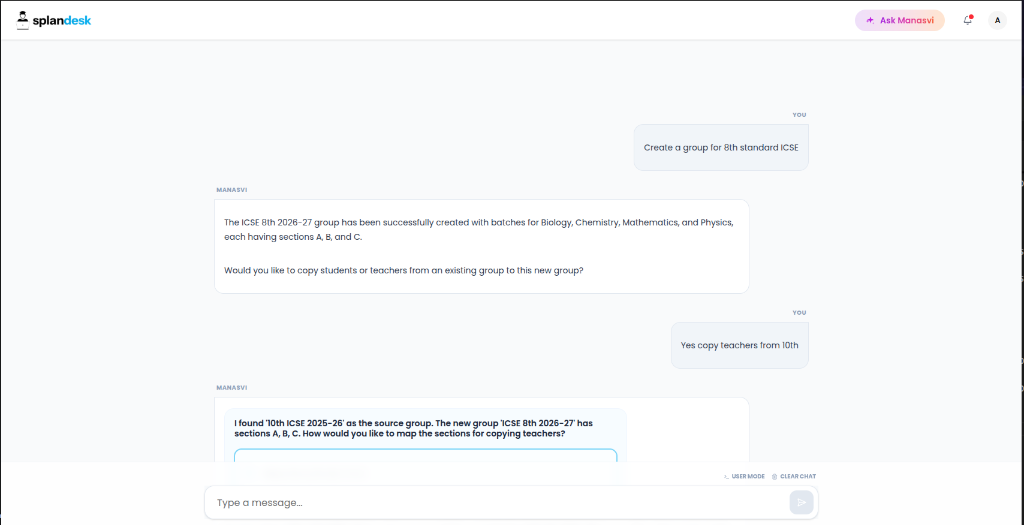
Manasvi can handle complex logistical tasks like yearly promotions and cloning groups.
- Group Creation: Ask Manasvi to "Create a group for 8th standard ICSE".
- Student Promotion: Move students from one cohort to the next (e.g., promoting 10th standard students to 11th).
- Teacher Sync: Copy teacher assignments from one group to another to save time during setup.
- Intellectual Mapping: Manasvi will ask you how to map sections if they differ between the source and destination groups.
4. Managing Group Members
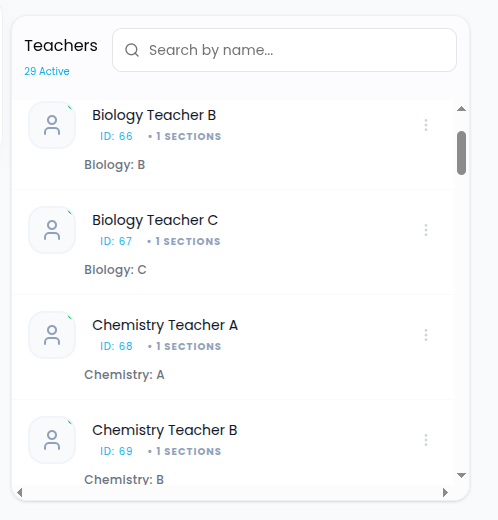
Click the "Manage Members" button on any teaching group to assign students and teachers.
Student Management
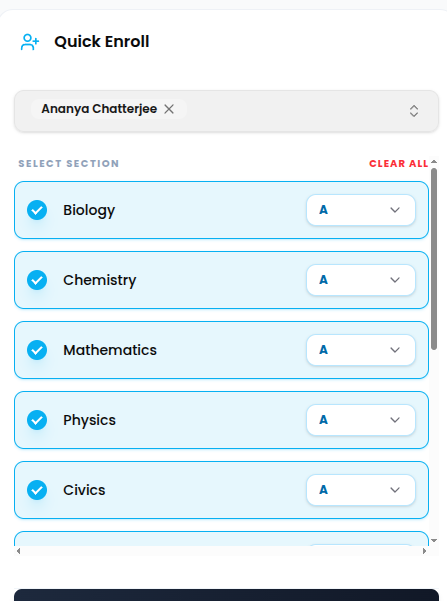
- Quick Enroll: Efficiently enroll multiple students by selecting them and assigning their subjects and sections in a single view.
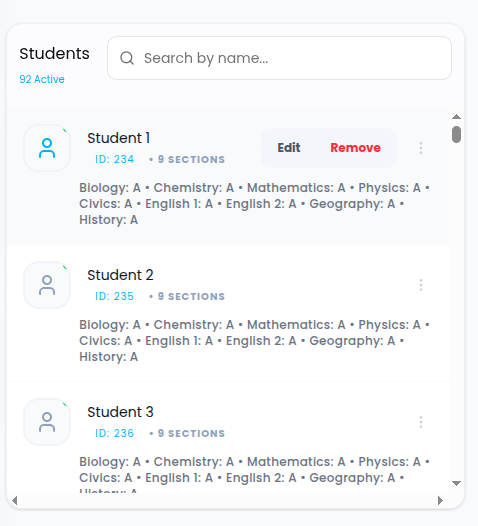
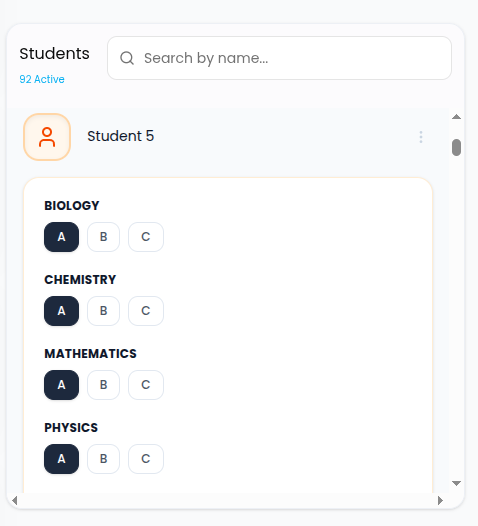
- Students List: View all active members in the group. You can use the Edit button to modify a student's subjects and sections simultaneously, or Remove them from the group.
Importing Members from Another Group
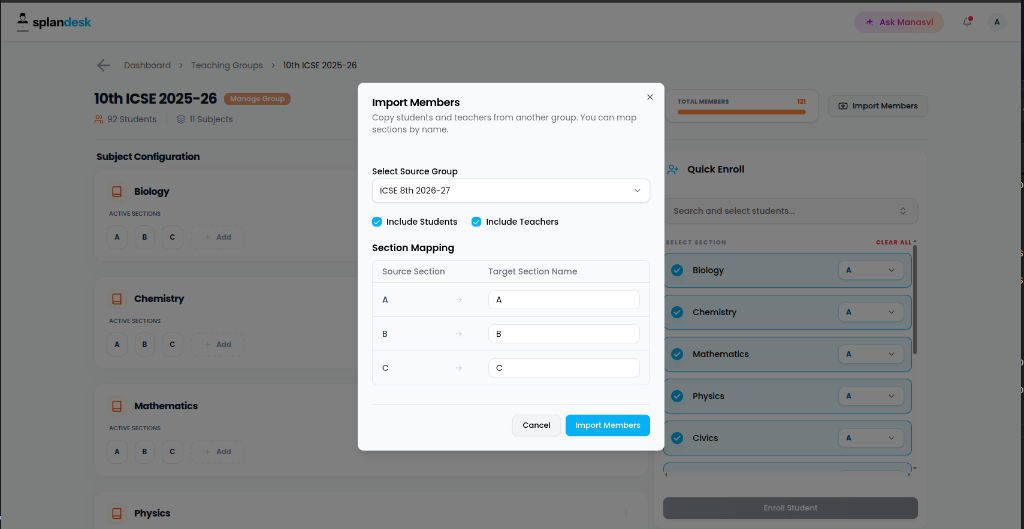
If you want to move students and teachers from an old group to this one (e.g., for yearly promotions):
- Click "Import Members".
- Select Source Group: Choose the group you want to copy members from.
- Toggle Content: Use the checkboxes to choose if you want to import Students, Teachers, or both.
- Section Mapping: Map the sections from the old group to the new section names in the current group (e.g., Old "A" → New "A").
Importing Historical Attendance
If you need to log attendance records from previous academic terms or sessions into the active teaching group:
- Click the "Import Attendance" button in the header card.
- Click "Download Excel Template" to download the pre-formatted Excel template (
attendance_template.xlsx). - Fill in the sheet with the respective dates, student usernames, and their attendance status.
- Click "Upload Excel File" to select and process the completed spreadsheet.
Daily Scoping Limit: The bulk historical attendance import strictly processes day-wise attendance (i.e. whether a student was present or absent on a specific calendar date). It DOES NOT support importing lecture-wise, test-wise, or topic-wise attendance schedules.
Importing Historical Test Scores
If you need to load historical exam marks and assessment results from prior academic terms into the active teaching group:
- Click the "Import Test Scores" button in the header card.
- Click "Download Excel Template" to download the pre-formatted Excel template (
historical_test.xlsx). - Fill in the spreadsheet with dates, test details, subject names, student names, and their obtained marks.
- Click "Upload Excel File" to select and process the completed spreadsheet.
The importer will automatically resolve subject names to active batches within the teaching group, match students based on their names/roll numbers, and publish their assessment results.
Teacher Management
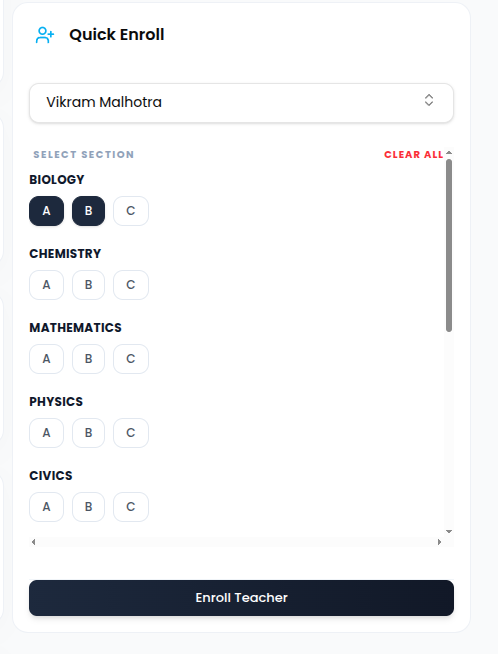
- Quick Enroll: Similar to student enrollment, select teachers and assign which subjects and sections they will teach.
- Teachers List: View and manage all educators assigned to the group.
5. Ask Manasvi
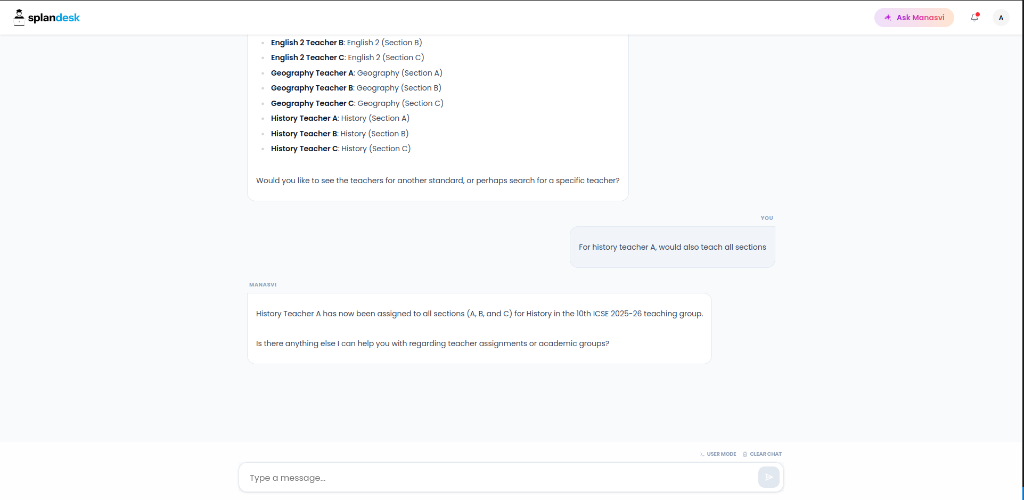
Manasvi can handle most tasks you can do in ui.
- Example: "For the 10th standard history teacher, they should also teach sections B and C in addition to their current section A."
- Action: Manasvi will update the enrollment across all specified sections instantly.
Fees & Payments
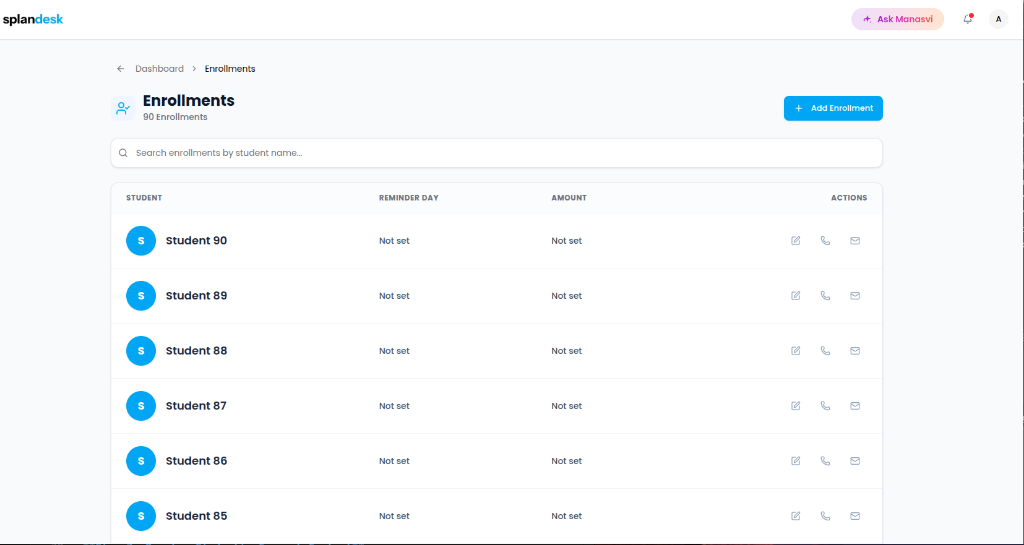
Track and automate student fee reminders from the Enrollments section.
1. Fee Reminders
You can set up monthly fee reminders for each student:
- Reminder Day: Choose the day of the month the reminder should be sent.
- Amount: Set the monthly fee amount.
- Automation: The system will automatically remind students to pay their fees every month based on these settings.
2. Tracking Payments
The enrollments screen provides a clear list of all students, their reminder settings, and payment status. Once a student pays, you can mark the payment as completed in the system.
Manage Class Rooms
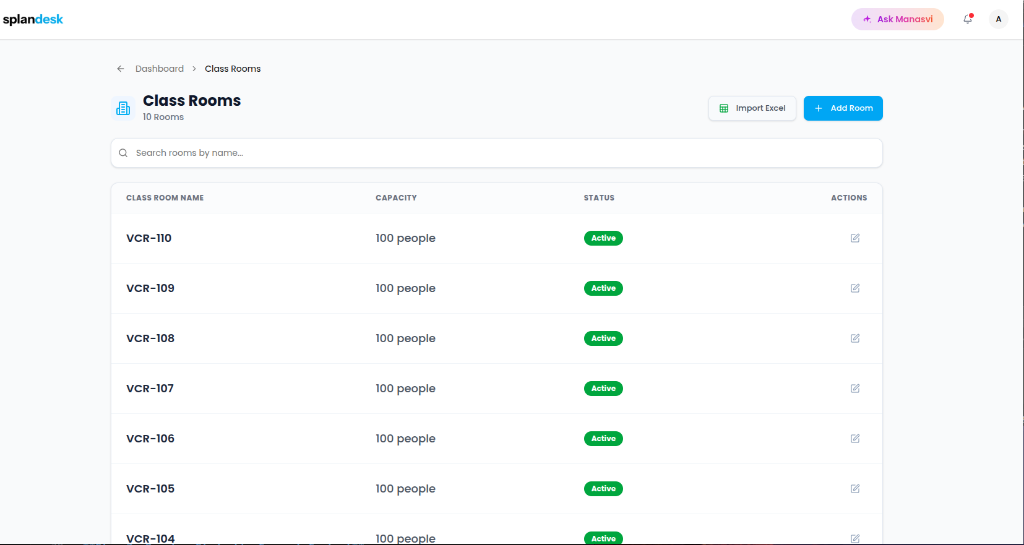
The Class Rooms section allows you to manage the physical infrastructure of your branch.
1. Rooms Overview
View all available rooms and their maximum student capacity.
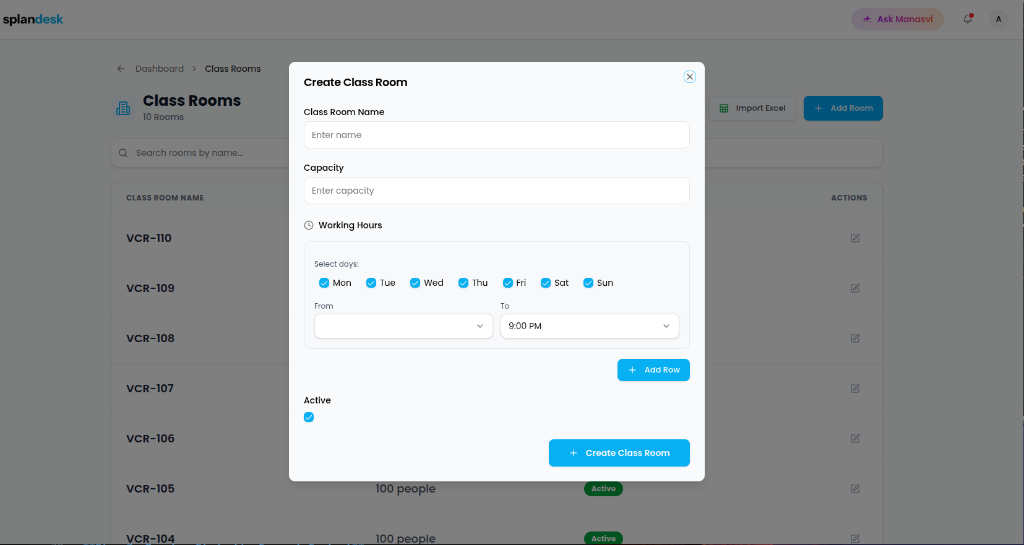
2. Adding a Room Manually
Click "+ Add Room" to define a new space:
- Name & Capacity: Enter the room identifier and how many students it can accommodate.
- Working Hours: Set the available timings for the room.
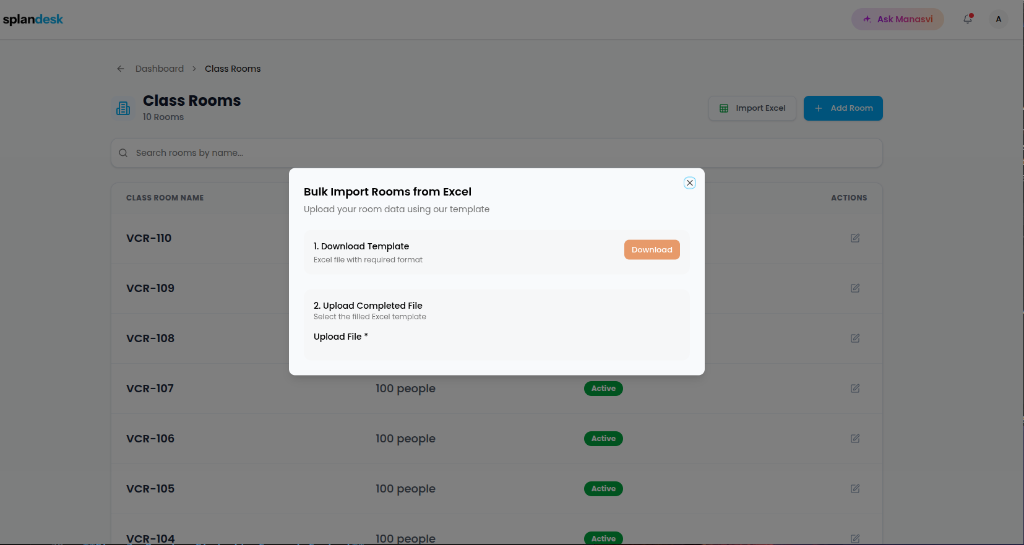
3. Bulk Import from Excel
Click "Import Excel" to add multiple rooms at once using our template.
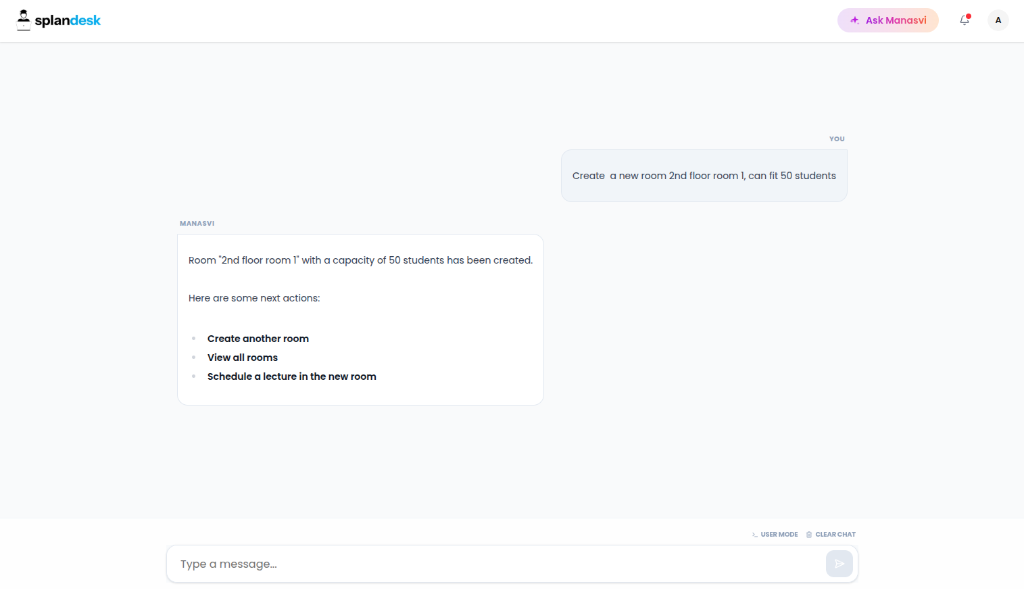
4. Ask Manasvi
Manasvi can instantly create single or multiple rooms. Simply paste the room details or tell Manasvi what you need.
Curriculum & Subject Management
The Subjects section allows you to manage academic subjects, standards, and their associated chapters.
1. Curriculum Overview
View a detailed list of all subjects registered in your branch, including their standards, education boards, and competitive exam filters.
2. Adding a Subject Manually
Click "+ Add Subject" to define a new subject:
- Name: Enter the custom subject name (e.g., "10th Physics CBSE").
- Core Subject: Select the underlying standard subject (e.g., "Physics").
- Standard & Board: Assign the specific grade and education board.
3. Bulk Import Subjects and Chapters
If you need to bootstrap or load a large list of subjects and their corresponding chapters/curriculum:
- Navigate to the Subjects list and click "Import Subjects".
- Click "Download Excel Template" to download the pre-formatted Excel template (
subject_template.xlsx). - Fill in the spreadsheet with standard, board, subject name, chapter number, and chapter name.
- Click "Upload Excel File" to select and process the completed spreadsheet.
The bulk curriculum importer will automatically ignore existing subjects and add any new chapters listed in the sheet to build your syllabus seamlessly.
Branch Settings
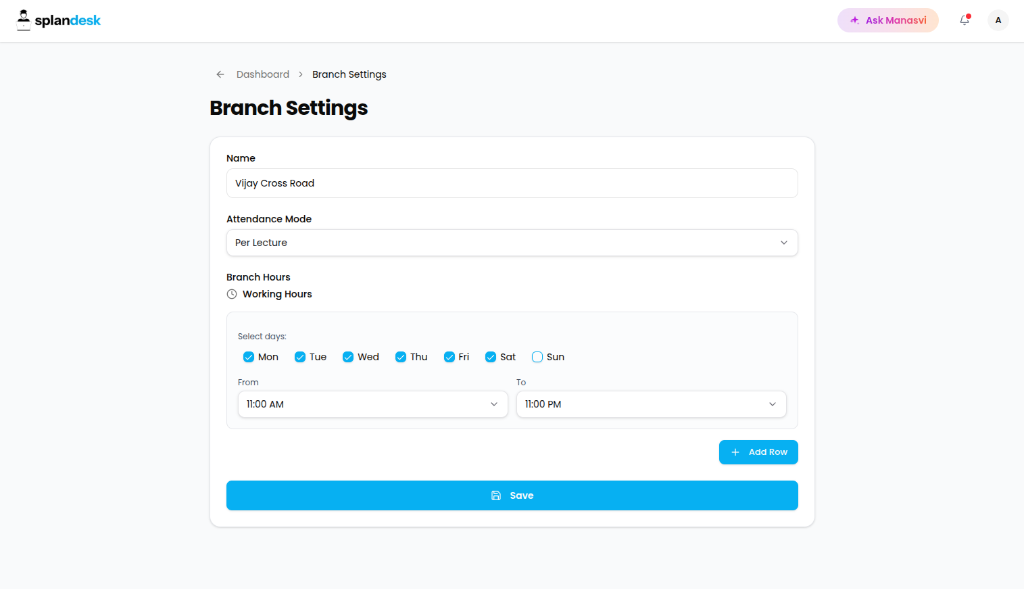
Configure your branch's core details and operational hours in the Branch Settings section.
- Branch Name: Update the public name of your physical location.
- Attendance Mode: Choose between "Daily" (one attendance per day) or "Per Lecture" (attendance tracked for every session).
- Working Hours: Define the global timings for your branch. These act as the default for scheduling lectures and assessments.
Academic Calendar
The Academic Calendar is the central hub for managing all branch activities, including lectures, tests, and room assignments. It provides a unified view of every standard, teacher, and room in your branch.
1. Weekly Overview
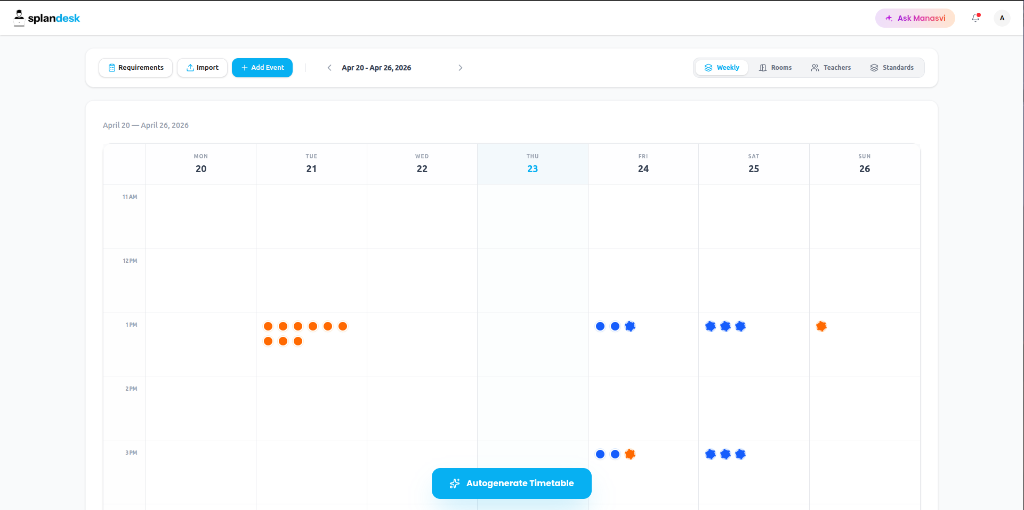
The weekly view allows you to see the entire branch's schedule at a glance. To maintain clarity with hundreds of weekly events, the calendar uses a Dot System:
Dot Colors (Event Types)
- ● Blue: Lectures
- ● Orange: Tests / Assessments
- ● Red: Conflicts (e.g., a teacher or room is double-booked)
Dot Shapes (Event Status)
- Circle (Solid): Real events that have been generated and are persistent.
- Corona (Gear Shape): Planned slots derived from the timetable templates. These are projected events that are automatically turned into real events every midnight for the following day.
2. Specialized Resource Views
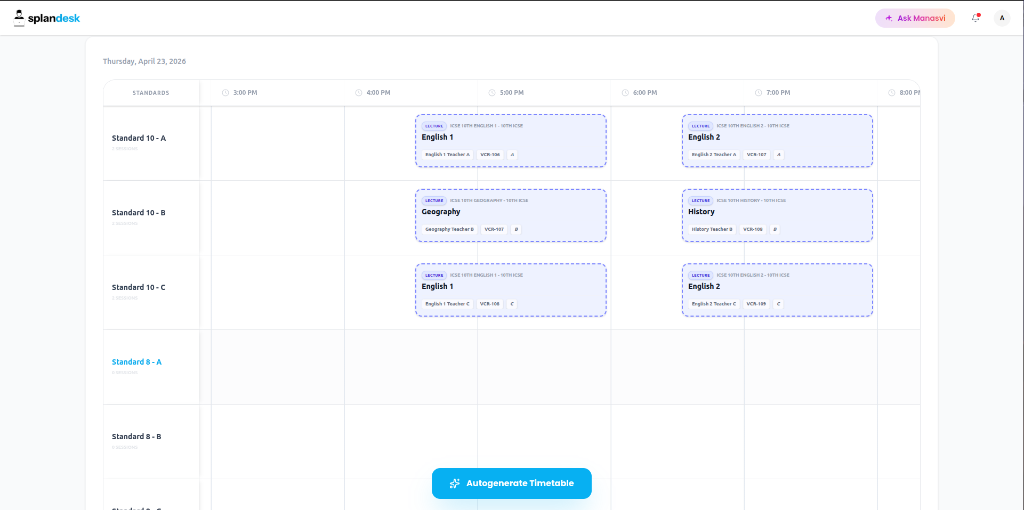
For more detailed daily management, you can switch between specialized views that organize the schedule by specific resources. In these views, the horizontal axis represents Time, while the vertical axis displays the resource.
- Rooms View: Track room availability. Use this to ensure no two lectures are scheduled in the same physical space.
- Teachers View: View the individual daily schedules for every teacher in the branch.
- Standards View: Monitor the daily schedule for each Standard and Section (e.g., 10th ICSE - Section A).
3. Adding Lectures
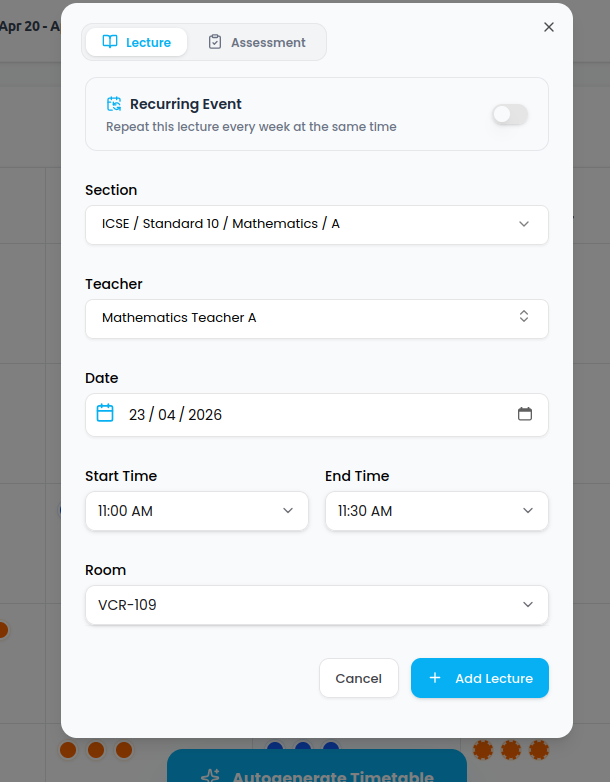
You can schedule both one-time and recurring lectures directly from the calendar using the "+ Add Event" button.
One-Time Lectures
To schedule a single lecture:
- Select the Section (e.g., ICSE / 10th / Mathematics / A).
- Choose the Teacher and the Room.
- Set the Date and the Start/End Times.
Recurring Lectures (Timetable)
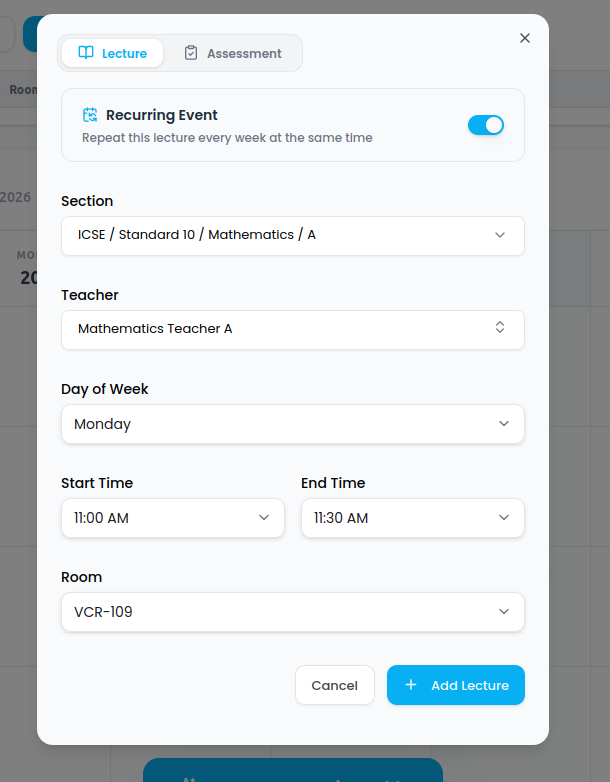
If a lecture happens every week:
- Toggle the "Recurring Event" switch.
- Instead of a date, select the Day of the Week (e.g., Monday).
- The system will automatically project this lecture into your weekly schedule indefinitely.
4. Scheduling Assessments (Tests)
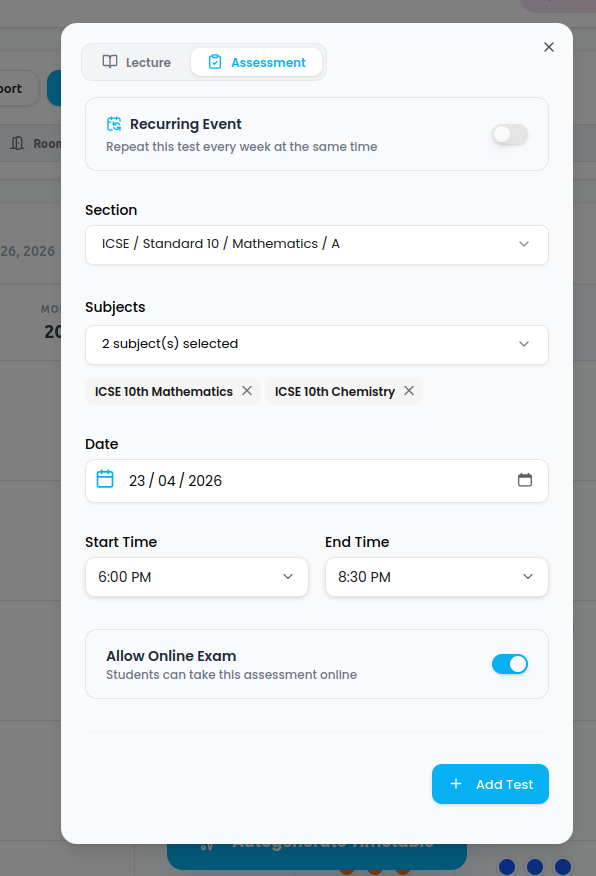
Scheduling assessments is similar to lectures but includes subject-specific options and online exam toggles.
One-Time Assessments
- Select the Section and the Subjects (multiple subjects can be selected for a single assessment).
- Set the Date, Start/End Times, and Room.
- Online Exam: Toggle "Allow Online Exam" if you want students to take the test through the mobile app.
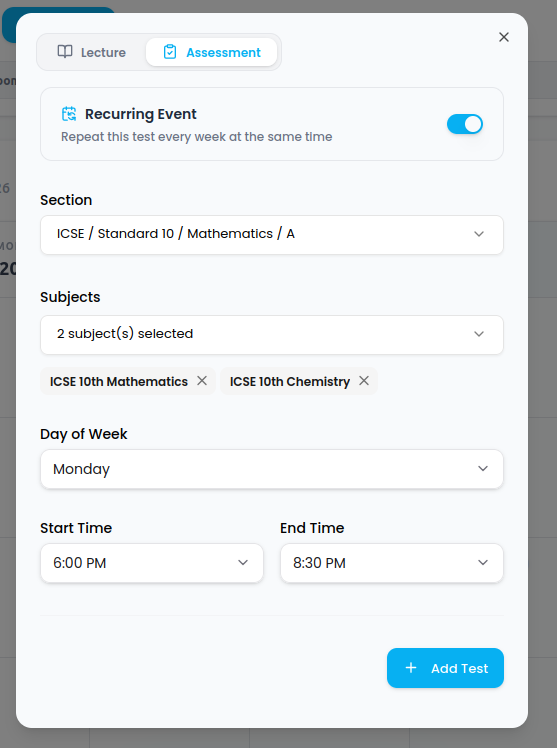
Recurring Assessments
For weekly practice tests or periodic assessments:
- Toggle the "Recurring Event" switch and select the Day of the Week.
5. Managing Events & Resolving Conflicts
Clicking on any dot in the calendar opens a detailed information popover.
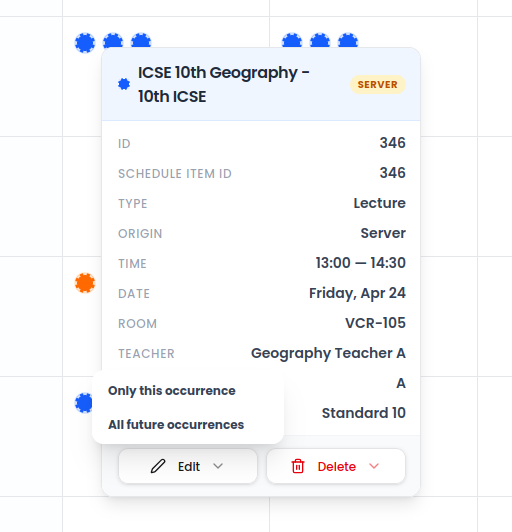
Edit and Delete Scopes
When you modify or remove an event that was part of a recurring schedule, you have two options:
- "Only this occurrence": Applies changes to the specific date and time you clicked. The rest of the recurring schedule remains untouched.
- "All future occurrences": Updates the event for today and all subsequent weeks. This is useful for permanent timetable changes.
Handling Conflicts (Red Dots)
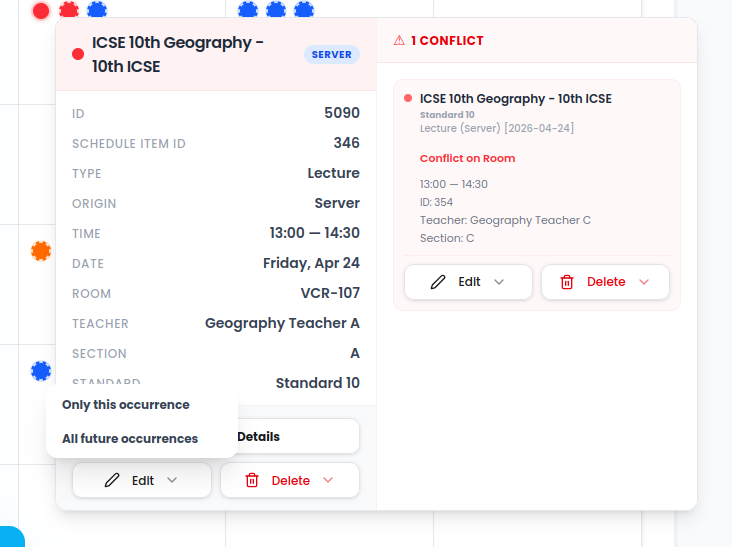
If a resource (Teacher, Room, or Section) is double-booked, the calendar will show a Red Dot.
- Click the red dot to see the Conflict Details.
- The popover will list exactly which resource is conflicting and which events are overlapping.
- You can resolve the conflict by editing one of the events to a different time, room, or teacher.
6. Teacher Unavailability & Substitutions
Splandesk streamlines the process of managing teacher leaves and ensuring classes are never left unattended.
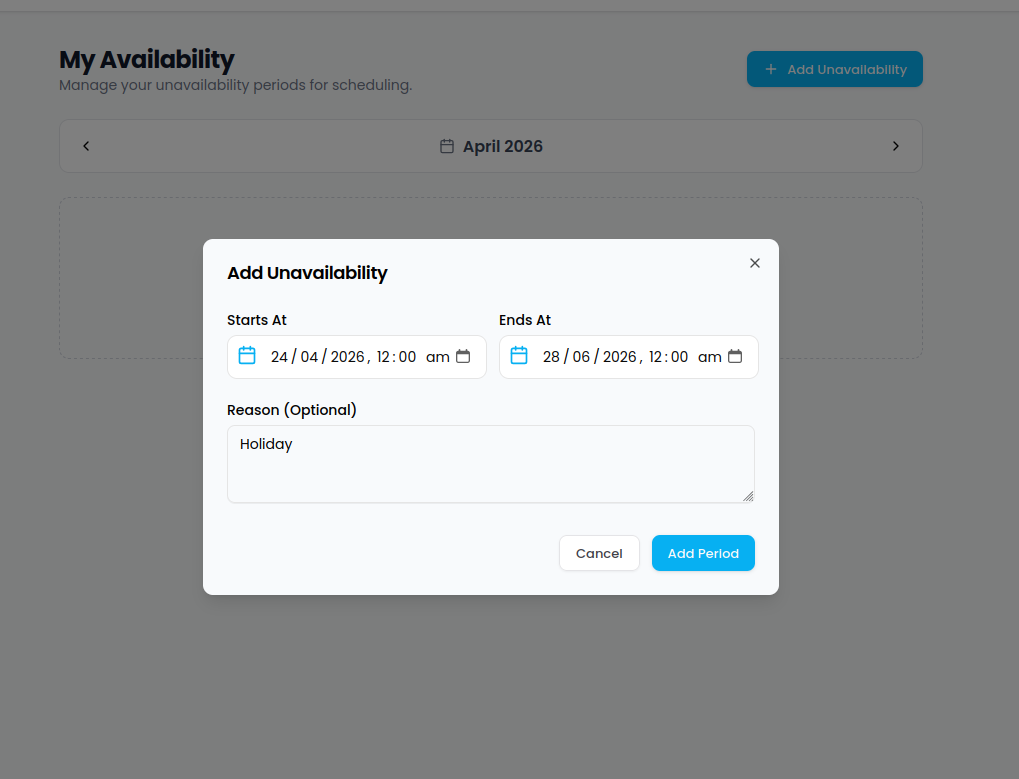
For Teachers: Setting Unavailability
Teachers can manage their own schedule by marking periods when they are unavailable (e.g., for holidays or medical leave):
- Set Duration: Select the start and end dates/times for the unavailability.
- Reason: Provide an optional reason for the leave.
For Admins: Assigning Substitutes
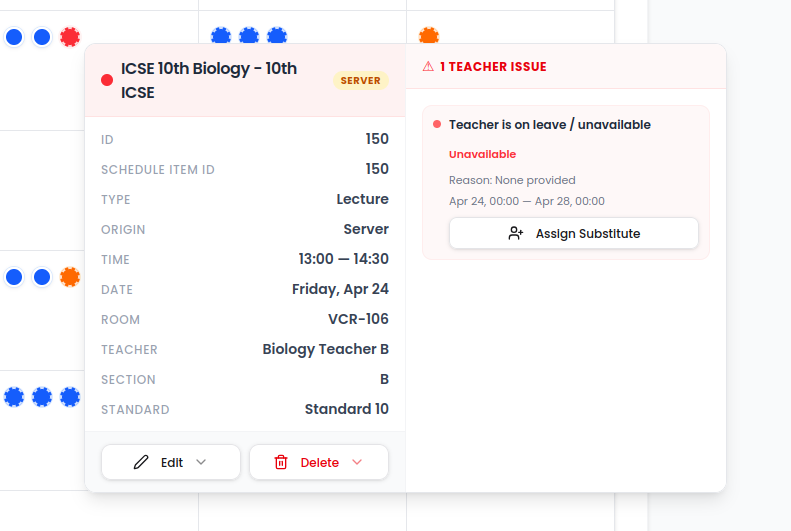
When a teacher marks themselves as unavailable, any lectures assigned to them during that period will be flagged with a Teacher Issue on the calendar.
- Click the red-bordered event to open the popover.
- Click "Assign Substitute".
- A list of available teachers (from your branch or other branches) will appear.
- Select a teacher to instantly assign them as the substitute for that session.
7. Bulk Import Timetable
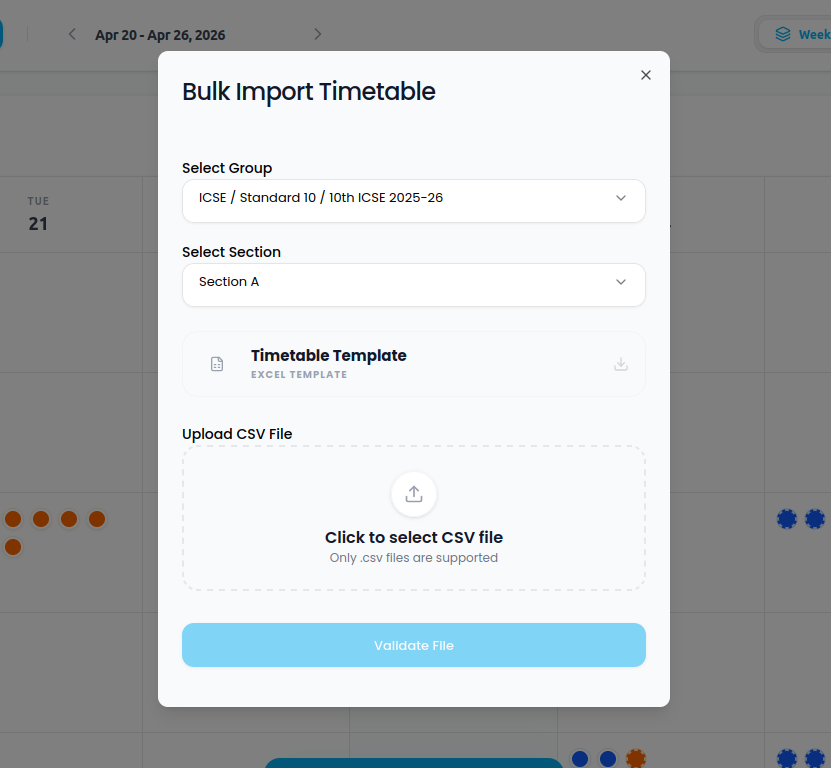
If you already have a structured timetable in Excel or CSV format, you can import it in bulk for any teaching group.
- Click the "Import" button on the calendar screen.
- Select Group & Section: Identify which cohort the timetable belongs to.
- Download Template: Get the required format by clicking the download icon.
- Upload: Once you've filled in your schedule, upload the file (CSV format supported) and click "Validate File" to process the import.
8. Autogenerate Timetable
For branches with complex schedules, Splandesk can automatically generate a conflict-free weekly timetable based on your specific needs.
Step 1: Setting Requirements
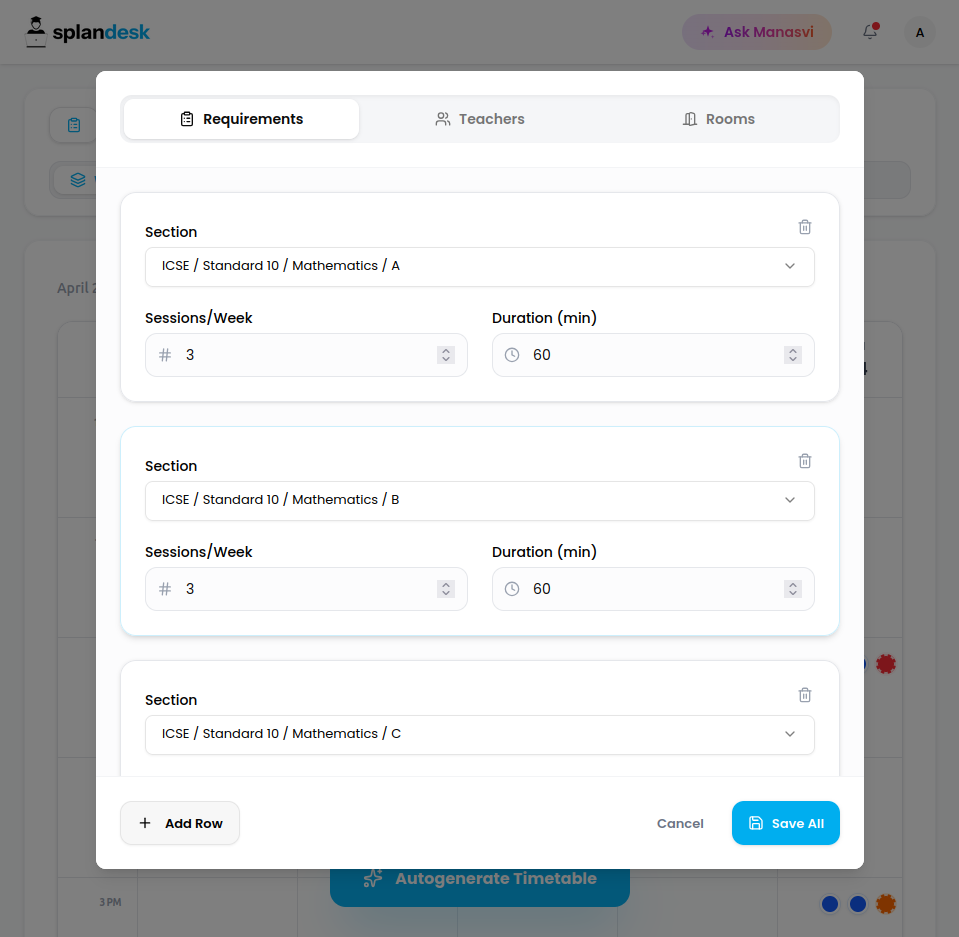
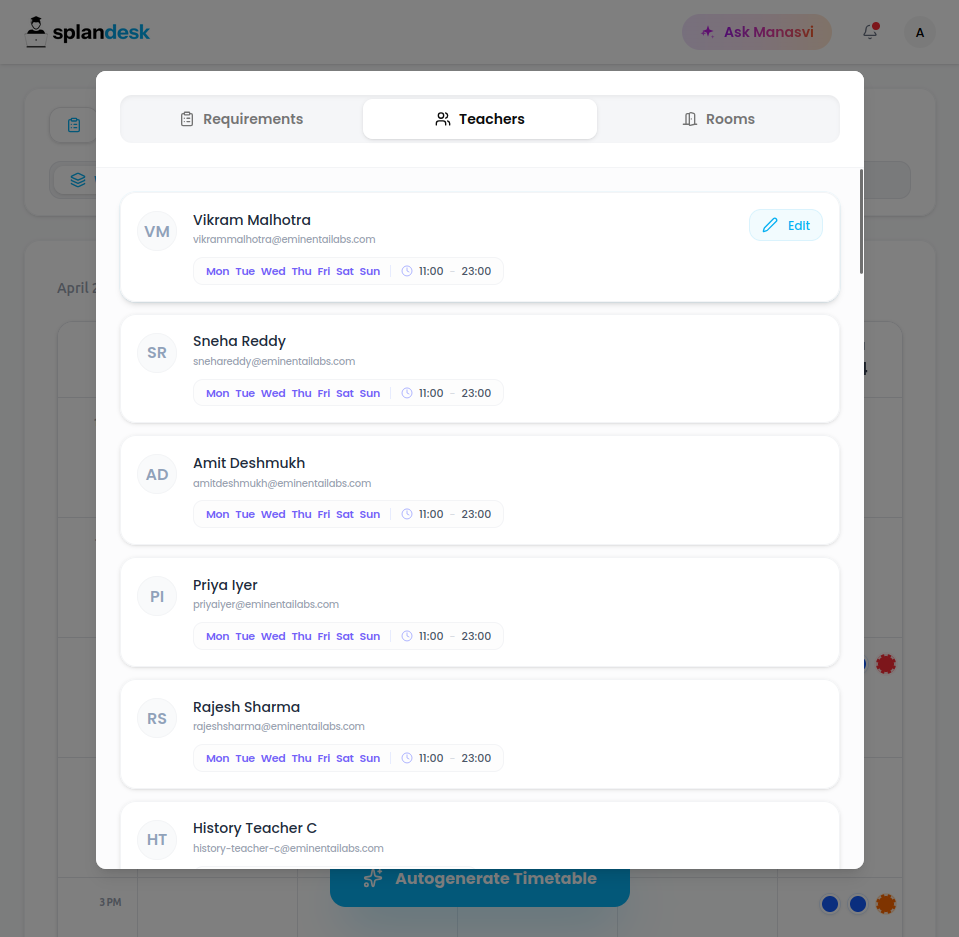
Before generating the timetable, you must define the operational constraints. Click the Blue Notepad (Requirements) icon on the calendar to open the setup popup.
- Requirements Tab: Specify how many lectures each Section needs per week and the duration of each session (e.g., 3 lectures per week, 60 mins each). Click "Save All" once done.
- Teachers Tab: Set or review the working hours for each teacher. The AI will only schedule lectures during these periods.
- Rooms Tab: Set the availability for each classroom to prevent overbooking physical spaces.
All three data points—Lecture Requirements, Teacher Timings, and Room Timings—are essential for the AI to create a valid schedule.
Step 2: Generation & Draft Mode
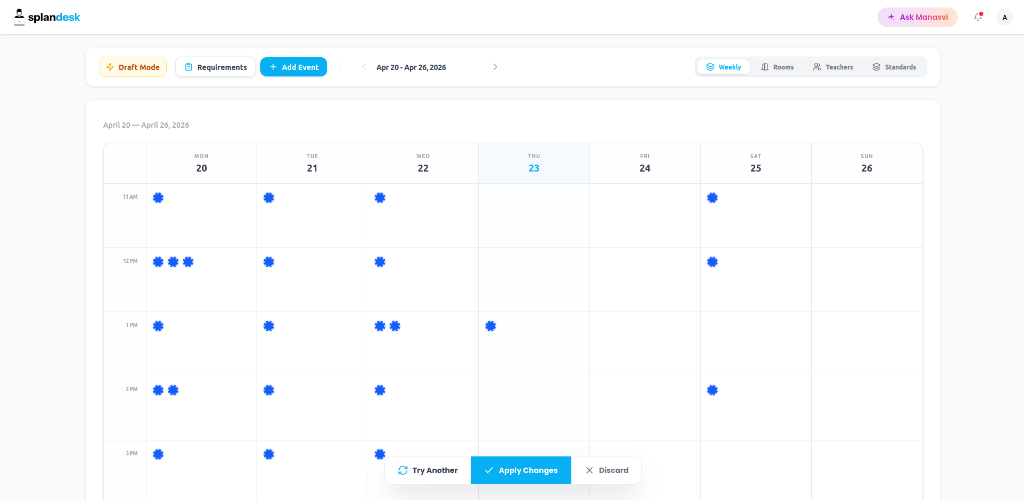
Once your requirements are set, click the "Autogenerate Timetable" button at the bottom of the calendar. The AI will analyze all constraints to provide a conflict-free solution.
- Reviewing the Draft: The system enters Draft Mode (indicated by the yellow badge). None of the changes are permanent yet.
- Interactive Editing: You can click on any generated dot to fine-tune it or use the "+ Add Event" button to manually add more sessions.
- Iterative Solutions: If you're not satisfied with the current result, click "Try Another" to see a different generation.
- Finalizing:
- Click "Apply Changes" to save the timetable and make it live.
- Click "Discard" to exit without saving any of the generated schedule.
Attendance Tracking & Logs
Splandesk provides a dual-layered approach to attendance: real-time marking for daily operations and historical logs for long-term tracking.
1. Today's Attendance (Daily Operations)
To mark attendance for ongoing classes:
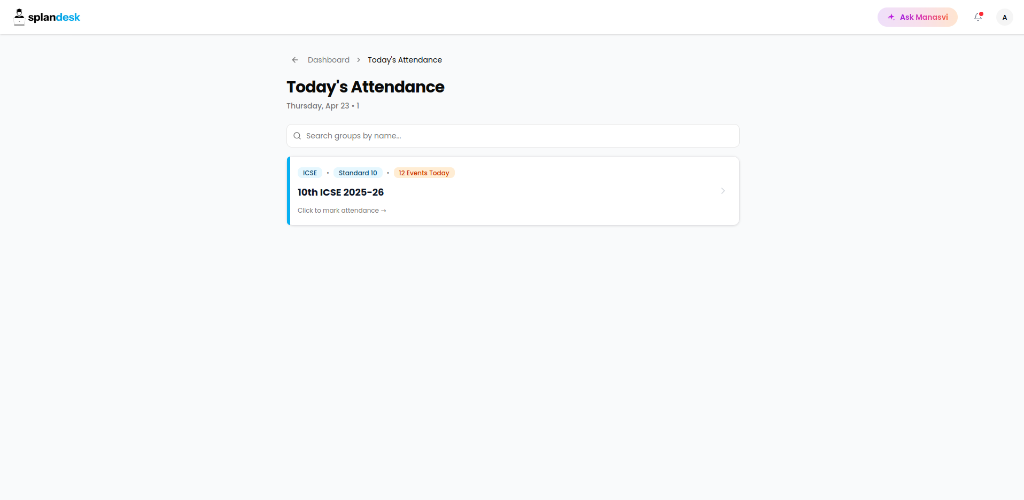
- Click "Today's Attendance" on the dashboard.
- Select Group: You will see a list of all teaching groups with scheduled events for the day.
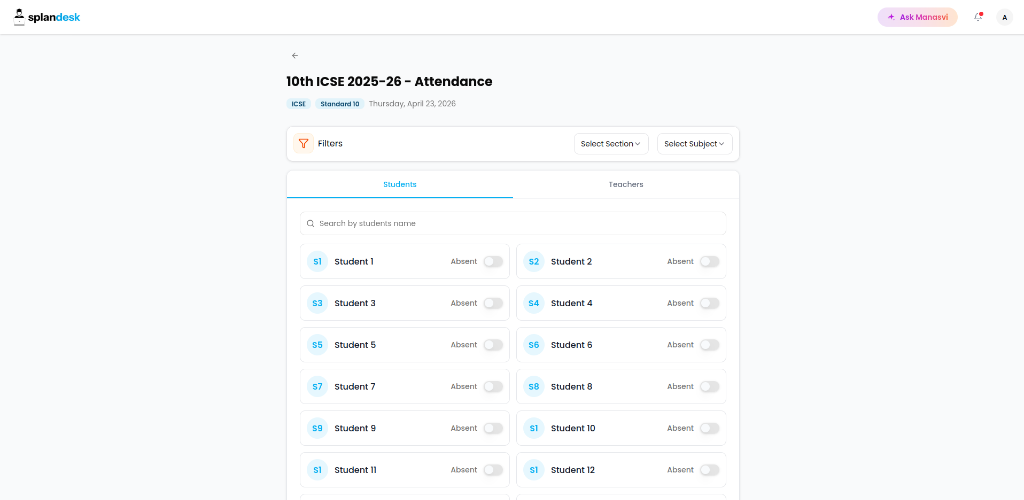
- Marking Attendance:
- Switch between the Students and Teachers tabs.
- Use the Section and Subject filters to narrow down the list.
- Toggle the switch next to each name to mark them as Present or Absent.
- You can also search for individuals quickly using the search bar.
2. Attendance Logs & Heuristics
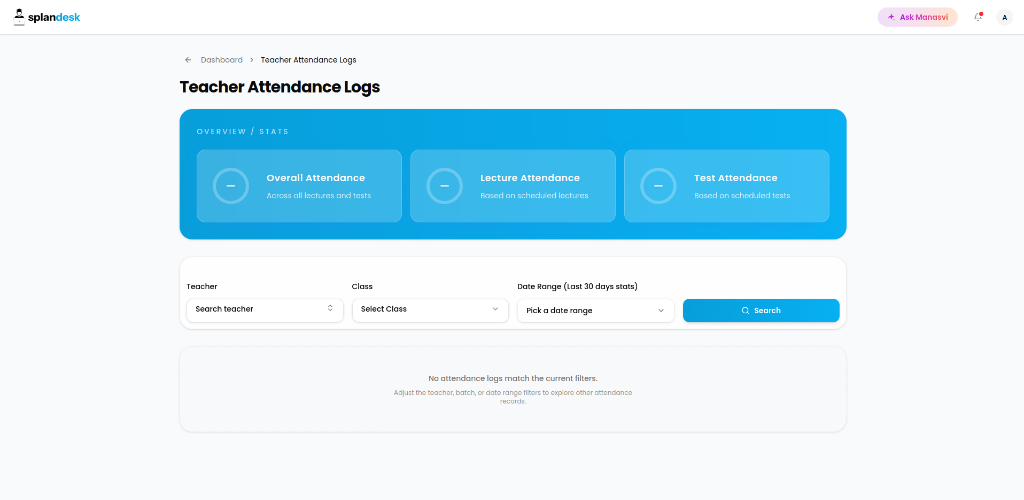
For admins and managers, the Attendance Logs section provides deep insights into participation patterns.
- Visual Stats: View overall, lecture-based, and test-based attendance percentages at a glance.
- Granular Filters: Search by specific Teacher, Class, or Date Range to find exact records.
- Missing Logs: The system helps identify classes where attendance has not yet been marked.
Assessment & Question Management
Create and manage high-quality examination papers with manual precision or AI assistance.
1. Managing Assessments
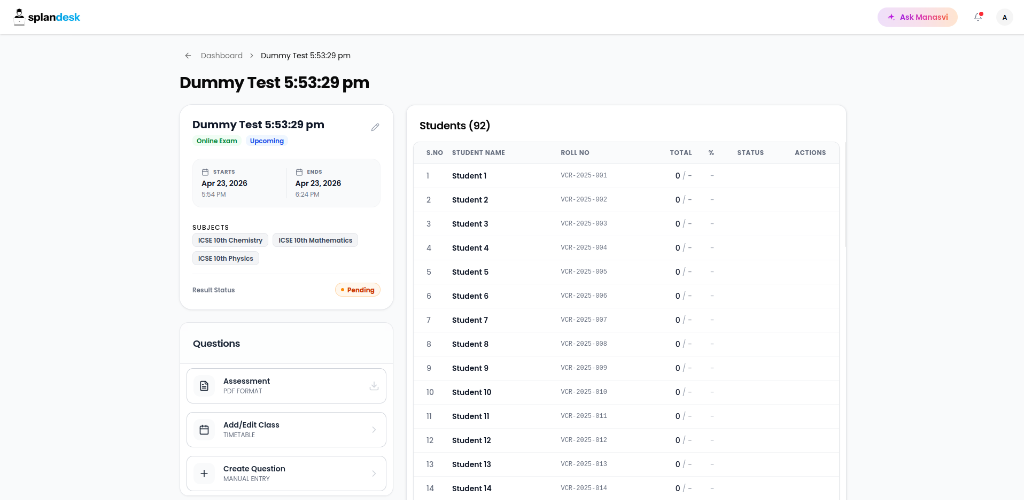
Access the Manage Assessment page from the calendar or the Assessment dashboard. This hub allows you to:
- Monitor student scores and status in real-time.
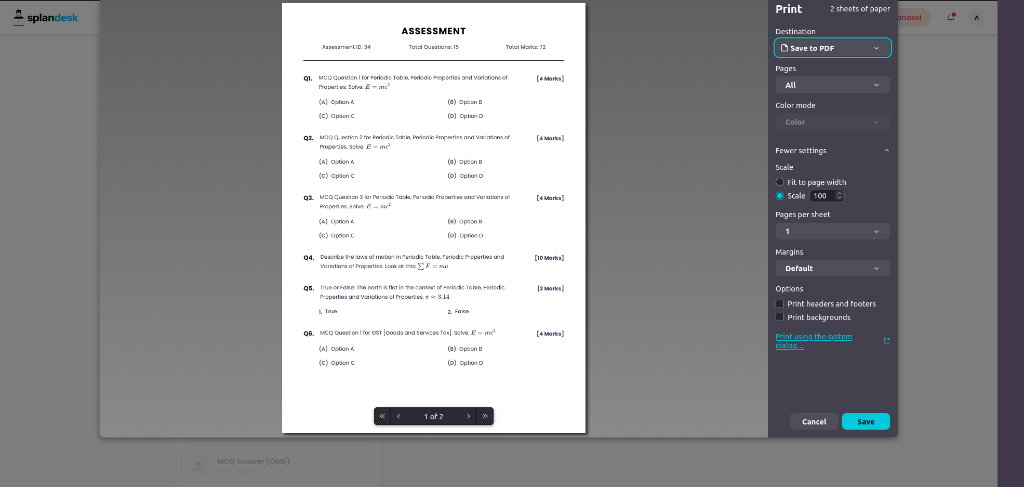
- View and download the assessment in PDF format.
- Access the question editor to build your paper.
2. Building the Question Paper
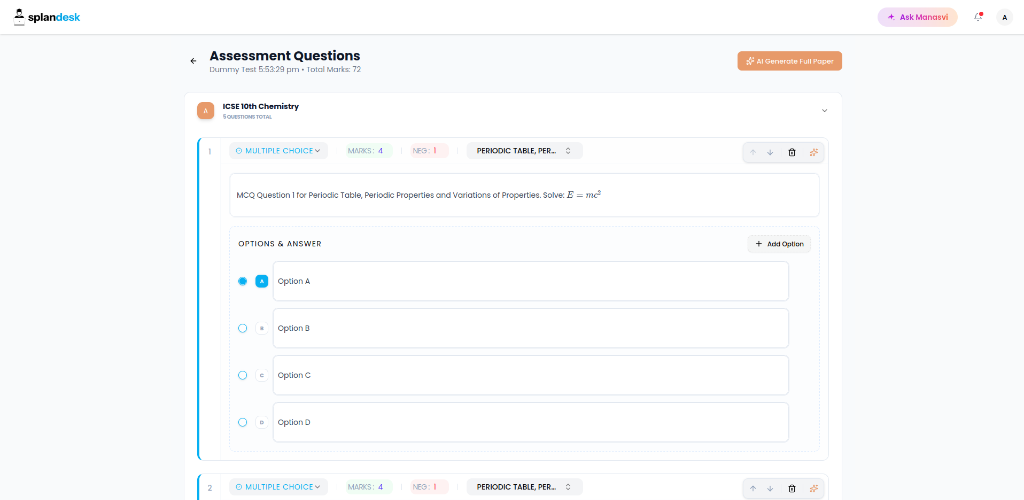
You can construct your paper using the "Create Question" tool.
Manual Entry & Math Support
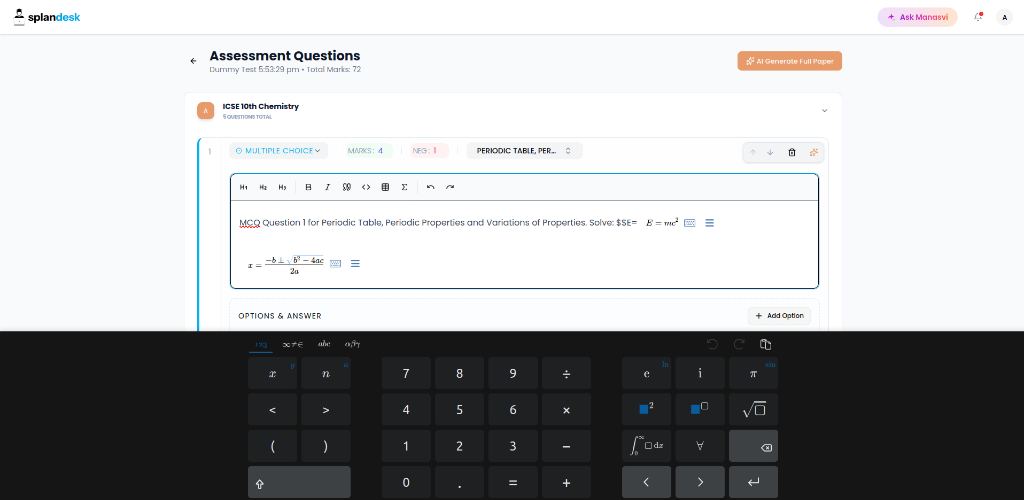
For Science and Math assessments, Splandesk includes a powerful Math Editor.
- Question Types: Choose from Multiple Choice (MCQs), True/False, or Subjective questions.
- Rich Formatting: Use the built-in Math keyboard to insert complex LaTeX formulas, equations, and symbols just like a Word-based math editor.
- Metadata: Assign Marks, Negative Marks, and Chapter tags to every question for better analytics.
AI-Powered Generation
Save hours by using the "AI Generate Full Paper" feature, or use AI to refine your manually created questions.
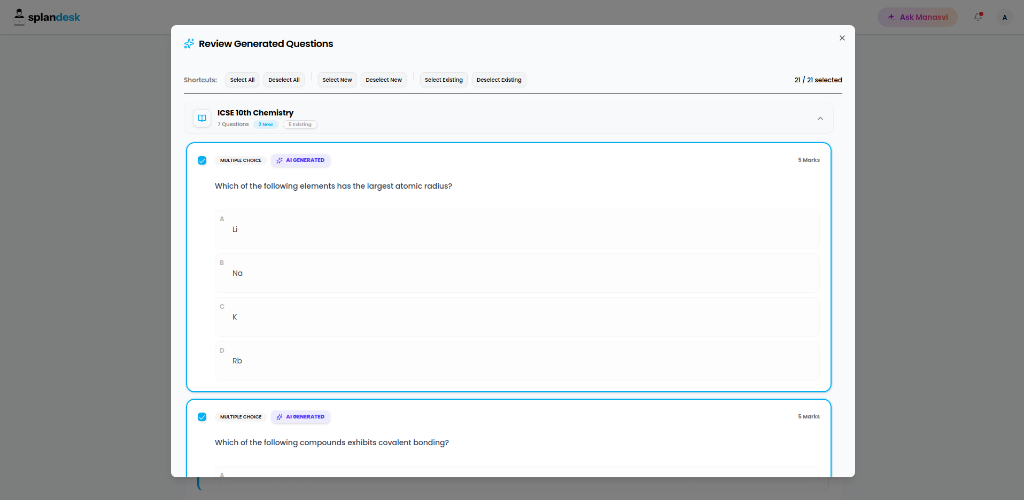
- Full Paper Generation: Describe the topics, difficulty level, and question types you need. The AI will generate a complete set of questions which you can review and filter.
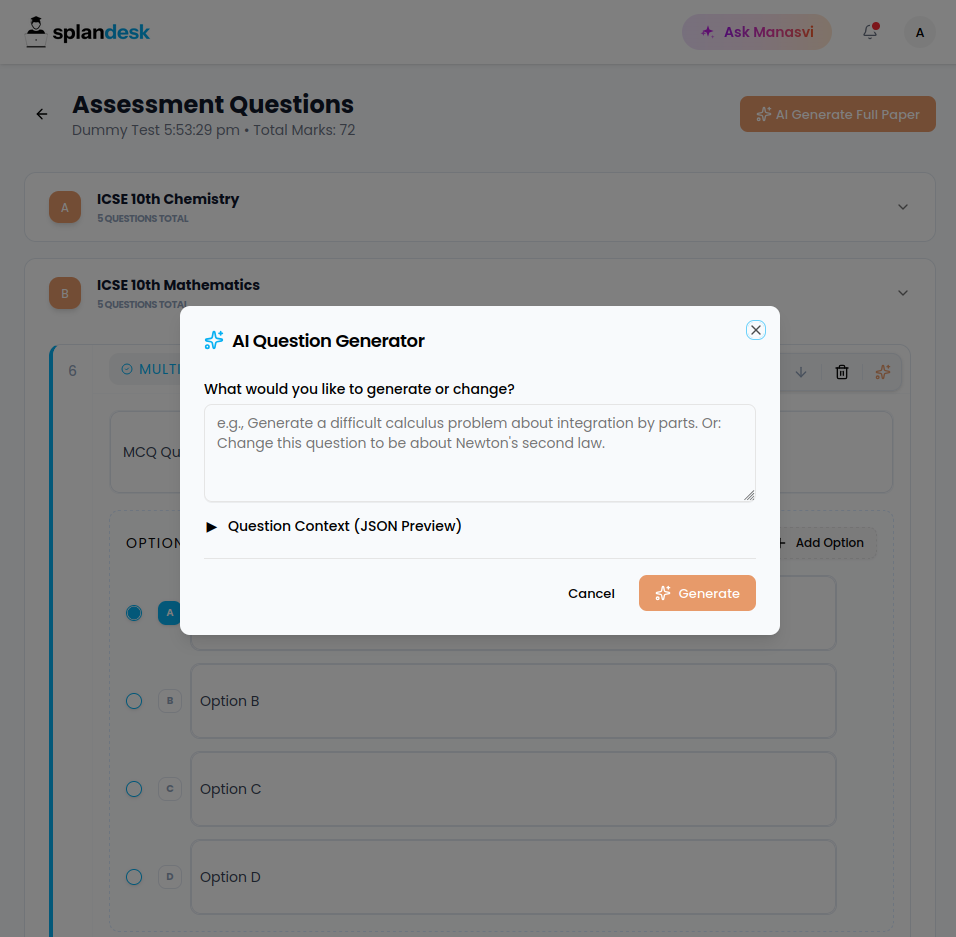
- Single Question Assistance: Click the Magic Wand (AI) icon next to any individual question to instantly generate its content or change it based on a specific prompt (e.g., "Make this a difficult integration problem").
3. Taking an Online Exam (Student Portal)
Students can participate in examinations through their dashboard if the "Online Exam" toggle is enabled for the assessment.
Starting the Examination
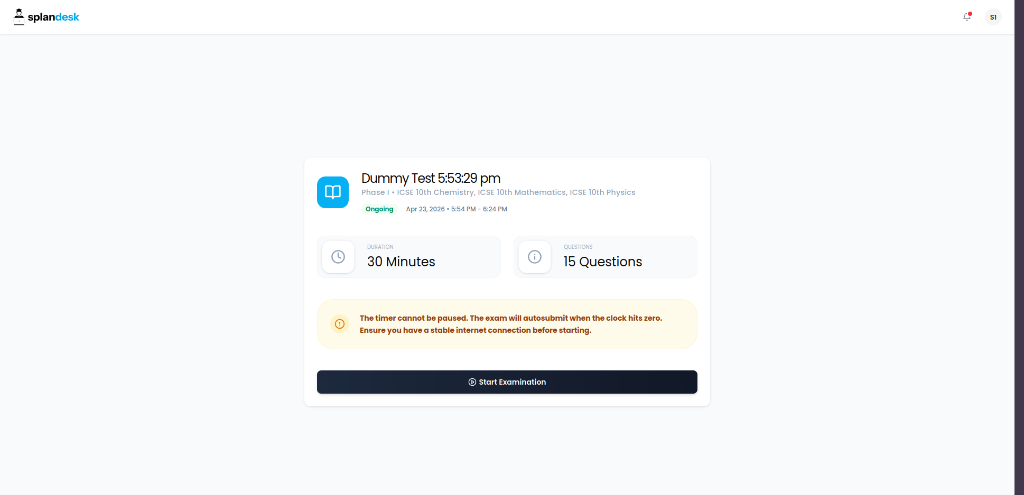
Before beginning, students are presented with a landing page showing the test duration, number of questions, and important instructions.
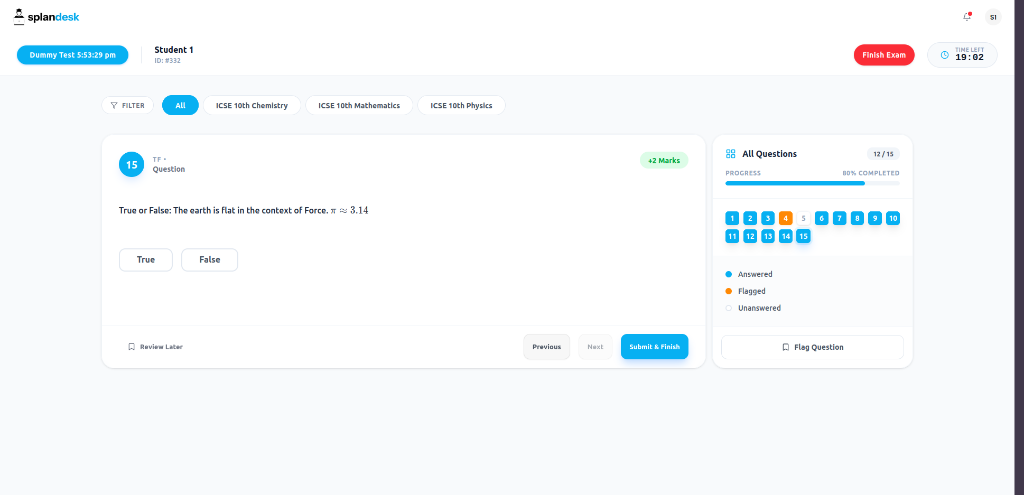
- Timer: The clock starts ticking immediately once the student clicks "Start Examination".
- Auto-Submit: If the timer reaches zero, the system will automatically submit the current progress.
The Examination Interface
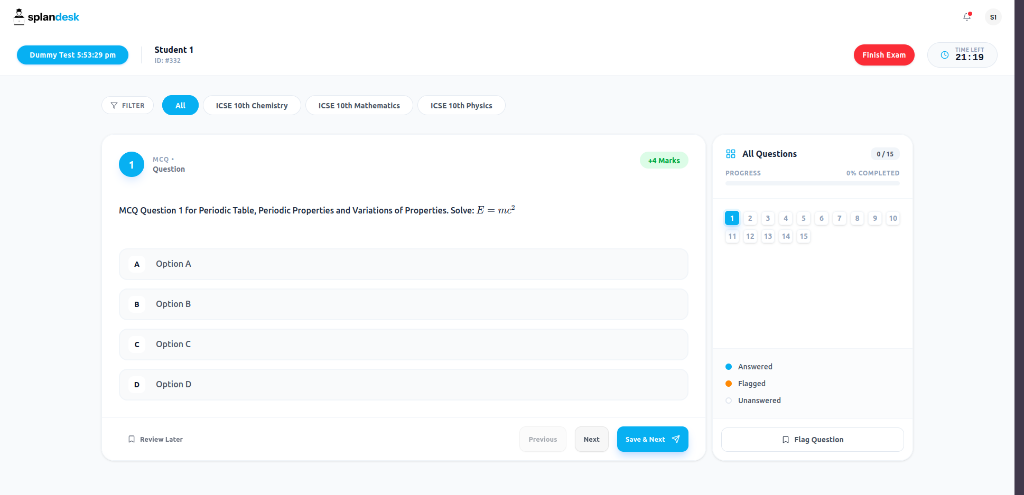
The portal is designed to help students focus and manage their time effectively.
- Answering: Select options for MCQs or type responses for subjective questions.
- Navigation Grid: A side panel shows all questions.
- ● Blue: Answered
- ● Orange: Flagged for Review
- Gray: Unanswered
- Filtering: Students can filter questions by Subject to tackle specific sections first.
- Completion: Once finished, click "Submit & Finish" to end the session.
4. Evaluation & Grading
For online assessments, Splandesk automates the grading process while giving teachers full control over the final score.
Scoring Overview
Once a student submits their exam, their results appear on the Manage Assessment dashboard.
- Auto-Grading: Scores for Objective questions (MCQs, True/False) are calculated instantly by the system.
- Partial Status: Experiments containing subjective questions or those awaiting manual review will show a "PARTIAL" status.
- Manual Review: Click the "Evaluate" button next to a student's name to open the detailed grading interface.
Using the Evaluation Screen
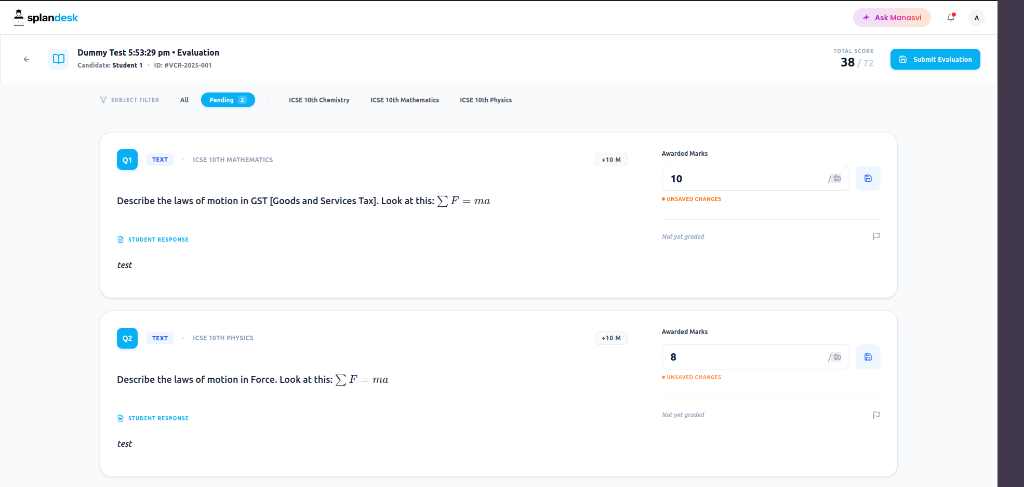
The evaluation screen allows for precise grading of subjective and pending questions:
- Smart Filters: Quickly toggle between "All" or "Pending" questions. You can also filter by specific Subject.
- Grading Workflow: View the student's response and enter the score in the "Awarded Marks" field.
- Save & Finalize: After entering marks, click "Submit Evaluation" to update the student's total score.
Finalizing & Publishing Results
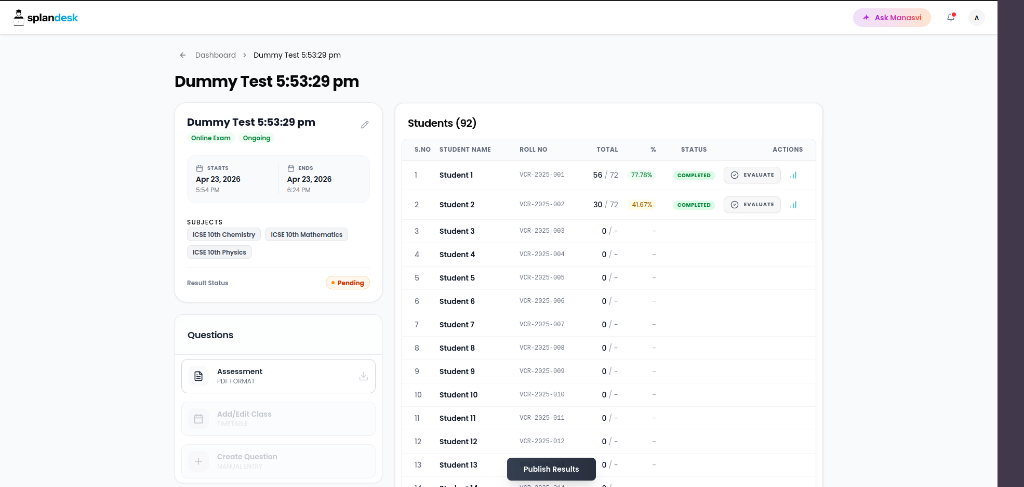
Once evaluation is complete for a student, their status will update to "COMPLETED". However, scores remain hidden from students during the grading phase.
To make the results live:
- Ensure all students have been evaluated.
- Click the "Publish Results" button at the bottom of the assessment dashboard.
- Students will now be able to see their total scores and individual question feedback on their portals.
Assessment Analytics & Heuristics
Splandesk goes beyond simple scores, providing deep insights into student performance through interactive analytics. You can access these by clicking the Graph (Analytics) icon next to any student on the assessment page.
1. Performance Overview
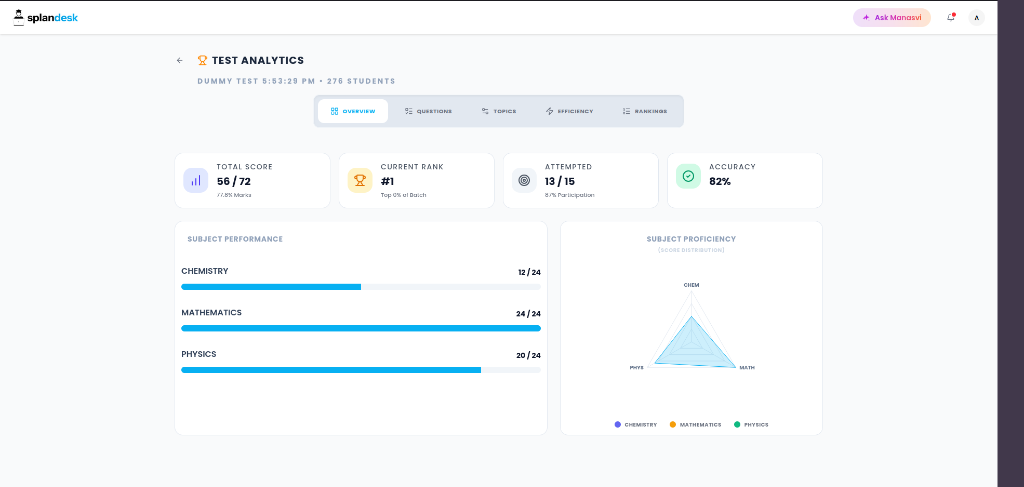
The Overview tab provides a high-level summary of the student's exam attempt.
- Key Metrics:
- Total Score: Final marks achieved out of the maximum possible.
- Rank: The student's relative position among all participants (e.g., #1).
- Attempted: The number of questions answered vs. total questions (Participation rate).
- Accuracy: Percentage of correct answers relative to total questions attempted.
- Subject-Wise Analysis:
- Visualized as both progress bars and a Radar/Polar Chart (Subject Proficiency).
- Helps teachers identify which specific subjects the student is struggling with and where they excel.
This section is vital for understanding behavioral patterns, such as whether a student is skipping too many questions or consistently failing in a particular subject area.
2. Question-Wise Analysis
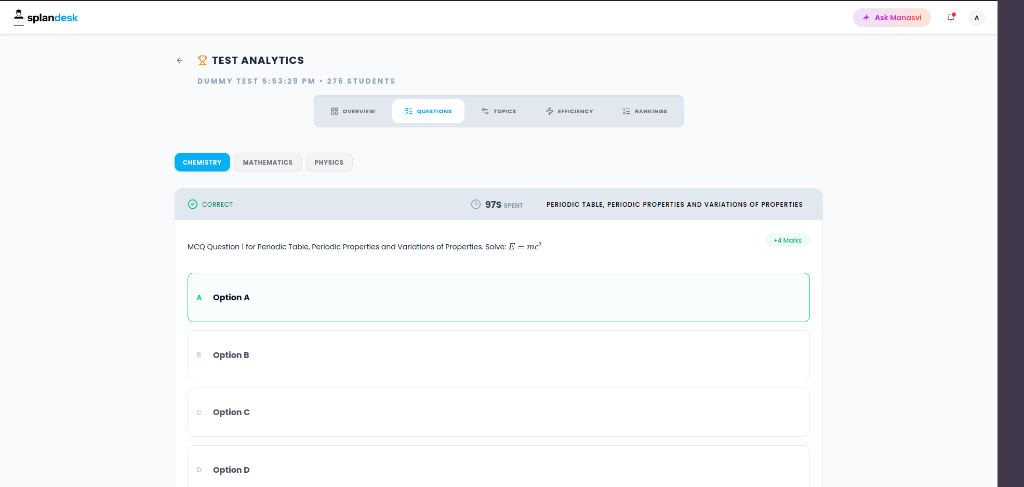
The Questions tab allows for a granular review of the entire exam paper from the student's perspective.
- Detailed Feedback: For every question, you can see if the student marked it correctly, the exact response they chose, and the marks awarded.
- Time Tracking: One of Splandesk's most powerful features is the Time Spent metric. You can see exactly how many seconds (e.g., 97s) a student spent on a particular question.
- Subject Filtering: Use the subject tabs at the top to quickly navigate between different parts of the assessment.
- Chapter Attribution: Each question is linked to its respective chapter, helping identify if specific topics need more attention.
This level of detail is instrumental for students to understand their own mistakes and for teachers to provide targeted remedial coaching.
3. Topic & Chapter Insights
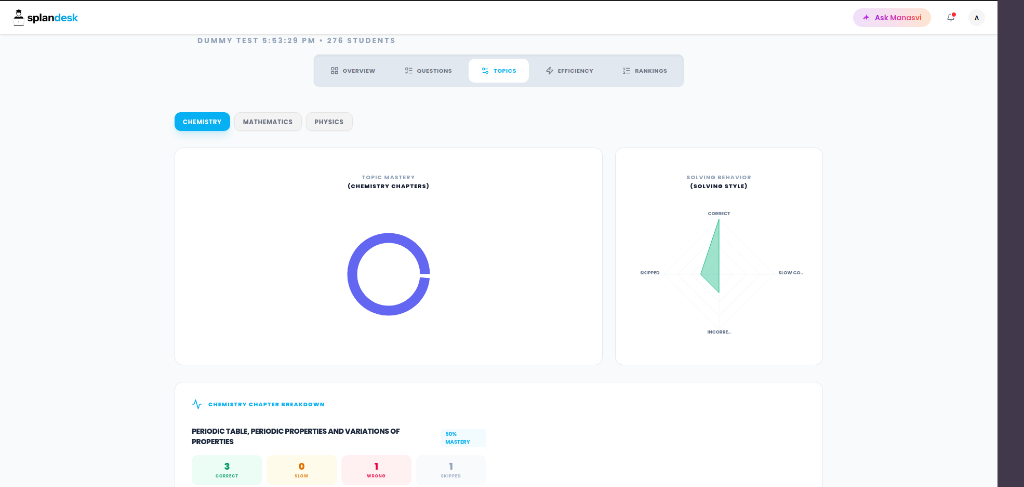
The Topics tab provides a diagnostic view of the student's mastery over specific parts of the syllabus.
Subject-Level Analysis
- Topic Mastery: A breakdown of marks achieved per chapter, helping prioritize which chapters need more study.
- Solving Behavior: A polar chart that categorizes every attempt into one of four buckets:
- Correct: Accurately answered within a standard timeframe.
- Correct But Slow: Final answer was right, but the student took significantly longer than the average time.
- Incorrect: Wrong answers indicating a lack of concept clarity.
- Skipped: Questions the student chose not to attempt.
Detailed Chapter Breakdown
At the bottom of the page, a chapter-by-chapter table provides the exact count for each behavior (Correct, Slow, Wrong, Skipped). This data allows students to decide their next steps:
- Should they focus on speed (for 'Correct But Slow' topics)?
- Should they re-learn the concept (for 'Incorrect' or 'Skipped' topics)?
4. Time Efficiency & Pacing
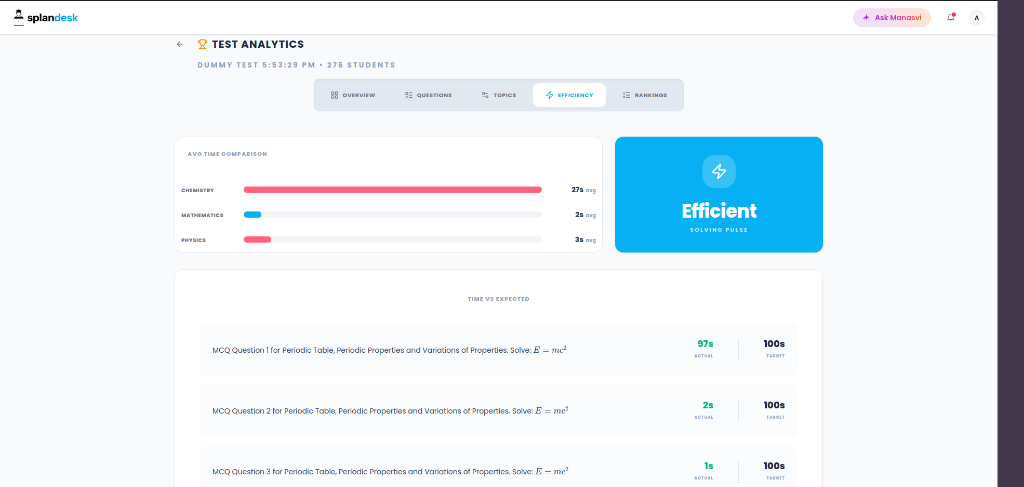
Competitive exams are a race against the clock. The Efficiency tab helps students master their exam pacing.
Subject-Level Benchmarks
- Average Time Comparison: Compare the average time spent per question across different subjects. For example, if a student spends 30s on Chemistry but 5s on Mathematics, they might be over-studying or over-thinking one subject at the cost of another.
- Solving Pulse: The system provides an overall feedback label (e.g., "Efficient") based on the student's speed relative to the total exam duration.
Question-Wise Pacing
At the bottom, a detailed list compares:
- Actual Time: Exactly how much time the student spent on the question.
- Target Time: The ideal time allocated for that specific question type/difficulty.
Identifying questions where the student exceeded the Target Time helps in strategizing for future tests—learning when to move on rather than getting stuck.
5. Peer Benchmarking & Rankings
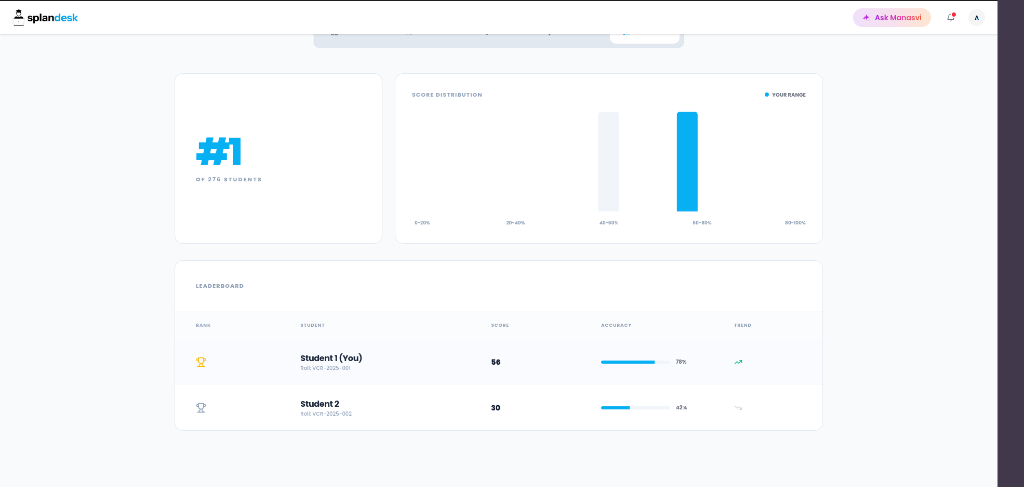
Understanding one's position within a larger cohort is essential for healthy competition and collaborative learning. The Rankings tab provides this context.
Competitive Standings
- Class Rank: Displays the student's current standing among all participants in the assessment.
- Score Distribution: A histogram visualizing the performance of the entire class. It highlights "Your Range" to show where the student fits relative to the rest of the group.
- Leaderboard: A ranked list of all students, including their scores, accuracy percentages, and performance trends.
Collaborative Potential
The leaderboard is more than just a ranking—it's a tool for peer-to-peer support. A student who scored lower in a particular subject can identify peers who performed exceptionally well and reach out for help or collaborative study sessions.
Offline Assessments
Splandesk provides comprehensive support for physical, paper-based examinations while maintaining the structure of digital assessments.
1. Preparing the Paper
Once you have added your questions (manually or via AI), you can generate high-quality printables:
- Download PDF: Access the "Assessment" card on the manage page to download a professionally formatted question paper.
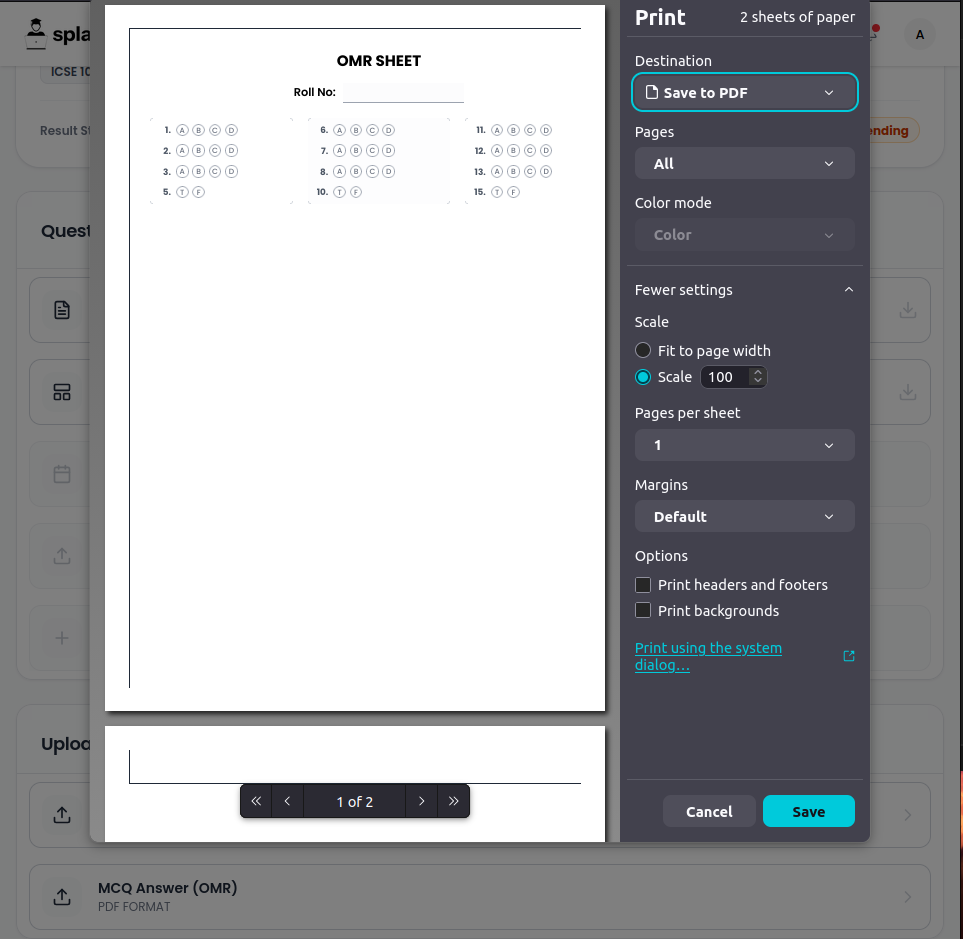
- Download OMR: For MCQ-heavy exams, use the "OMR Sheet" card to download standardized response sheets for students.
2. Selecting Sections
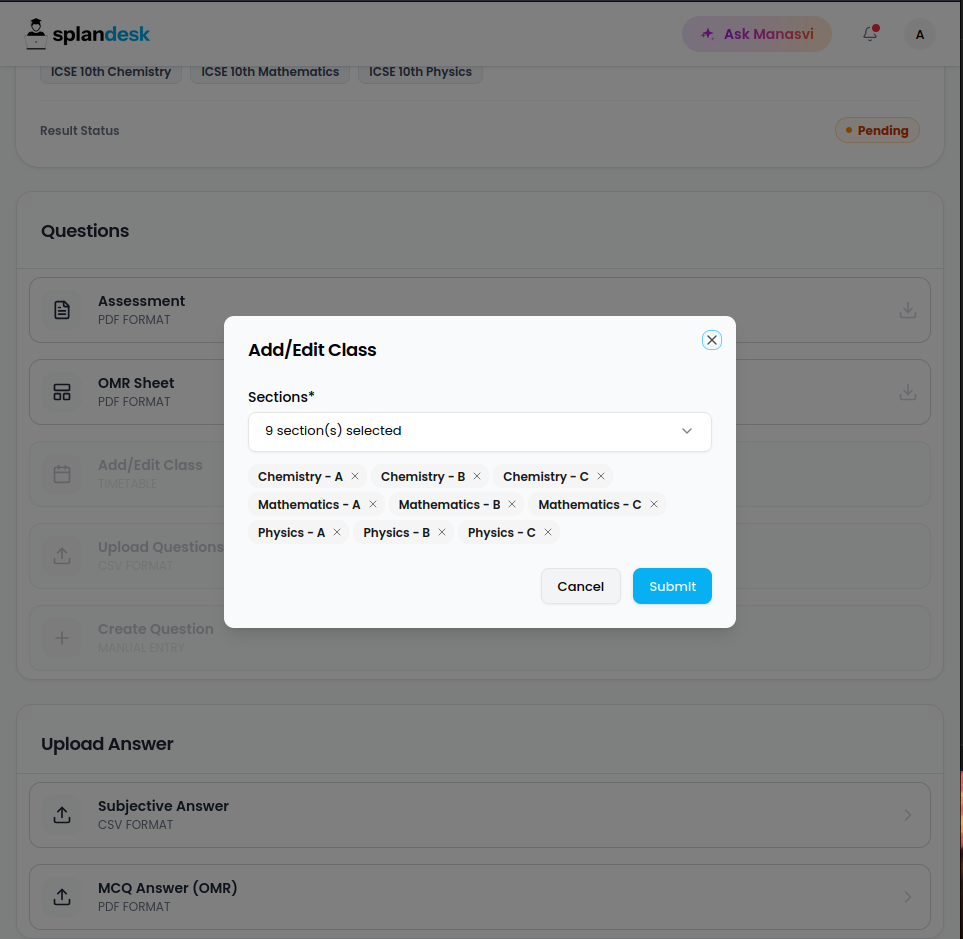
An assessment can be assigned to multiple groups simultaneously. Click on "Add/Edit Class" to select which specific sections (e.g., Mathematics - A, Physics - B) will be taking the test. This allows for unified grading across different cohorts.
3. Importing OMR Results
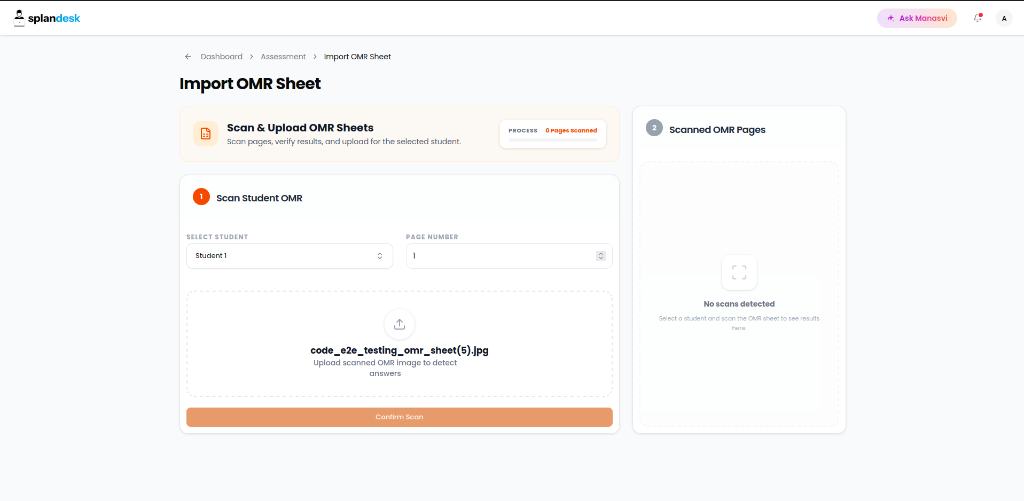
For paper-based MCQ exams, you can use the AI-powered OMR importer to grade papers instantly.
- Click "Import OMR Sheet" from the assessment manage page.
- Setup: Select the student name and the page number being uploaded.
- Upload: Drop the scanned image or photo of the filled OMR sheet into the upload zone.
- Verification: The system will display the image with detected bubbles.
- Correct Detection: Response dots should align perfectly with the student's marks.
- Incorrect Detection: If the image is too blurry or skewed, clear detection may fail. In this case, capture a clearer image and re-upload.
- Finalize: Once verified, click "Confirm & Save" to process the marks into the student's record.
4. Bulk Subjective Grading
For traditional subjective exams where answers are written on paper, Splandesk offers a bulk CSV-based grading system to save time.
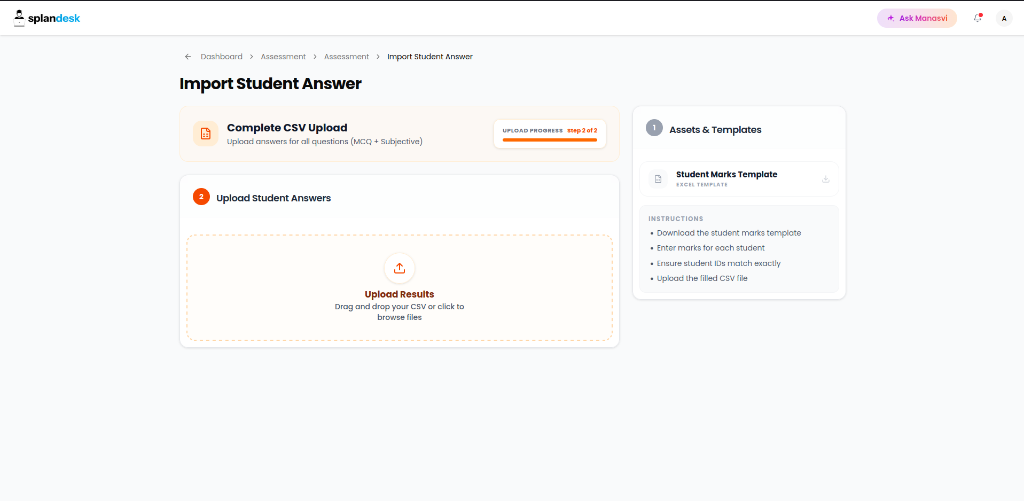
- Access: Click "Upload Subjective Answer" on the assessment dashboard.
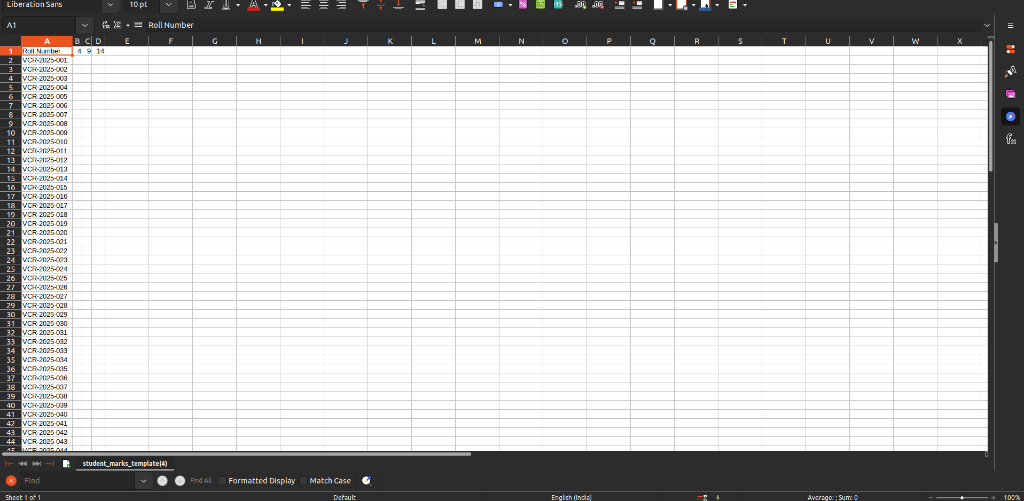
- Download Template: Click "Student Marks Template" to download a pre-formatted Excel/CSV file.
- Fill Marks:
- Each row represents a student identified by their Roll Number.
- Each column (e.g., Q1, Q2) corresponds to a subjective question in the assessment.
- Enter the awarded marks for each student in the spreadsheet.
- Upload: Drag and drop the finalized file into the upload zone.
This method allows you to grade the entire class in one go without navigating through individual student profiles.
Live Streaming and Class Recording
Splandesk includes comprehensive, high-performance Live Streaming and Video Recording capabilities tailored for hybrid coaching, remote tuition, and classroom archiving. While earlier the platform did not support these capabilities, Splandesk now features full native support for real-time live streaming, dual-channel recording, web-based editing, and granular view access control.
1. High-Quality Real-Time (No-Lag) Live Streaming
Splandesk delivers ultra-low-latency real-time video streaming engineered specifically for interactive education:
- Resolution & Quality Support: High-definition video broadcasts supporting 720 px (720p HD) and 1080 px (1080p Full HD) resolutions as of now.
- Zero-Lag Real-Time Infrastructure: Ultra-low latency, real-time (no-lag) streaming pipeline ensuring teachers and students can interact, ask questions, and solve doubts synchronously with no lag or buffering.
- Dual Broadcasting (Both In-App + YouTube):
- In-App Streaming: Broadcast directly inside the student and teacher web and mobile portals without requiring external third-party meeting links.
- YouTube Live Integration: Stream directly to your institute's YouTube channel via RTMP / Stream Key for public, unlisted, or private live classes simultaneously.
2. Lecture Recording (Both In-App + YouTube)
Every live session can be recorded in crystal clarity for on-demand student revision:
- High-Definition Video Recording: Both streaming and recording support high-quality 720 px and 1080 px video recording with synchronized audio and screen/whiteboard feeds.
- In-App Cloud Recording: Lectures are automatically captured, encoded, and saved to secure cloud storage linked directly to the corresponding batch, subject, and syllabus topic.
- YouTube Archiving: Option to record and archive directly into designated private or unlisted YouTube playlists for unlimited cloud hosting.
3. Trim & Edit Tools
Educators and administrators have access to integrated, browser-based Trim & Edit functionalities to polish video recordings before publishing:
- Start & End Trimming: Easily trim off pre-class setup time, waiting periods, and post-session chatter.
- Segment & Break Editing: Cut out class breaks or unnecessary interruptions from within the web interface without third-party video editors.
- Fast Lossless Processing: In-browser video clipping and trimming without lengthy re-rendering delays.
4. Selection-Based View Permissions
Granular permission management ensures total control over who can view each live stream and recorded video:
- Batch / Section Restrictions: Grant access strictly to students enrolled in specific batches or academic sections (e.g., JEE Section A only).
- Student-Level Selection: Select individual students who have permission to access a recorded session, review class, or make-up lecture.
- Access Policies & Validity: Set time-based validity windows or restrict external sharing and downloading to safeguard institute intellectual property.